Testing low voltage outdoor lighting ensures your garden or pathway remains well-lit and safe. It involves checking for issues like faulty connections, dim lights, or malfunctioning fixtures.
Outdoor lighting adds beauty and security to your home. But, it must function correctly to be effective. Testing your low voltage outdoor lighting can seem daunting. Yet, it is a simple process if you know the steps. This guide will help you understand the basics of testing these lights.
Whether you are a DIY enthusiast or a homeowner wanting to ensure your lights are in top shape, this article is for you. Learn how to identify and fix common issues to keep your outdoor space illuminated and secure.

Credit: www.youtube.com
1. Essential Tools For Testing: How to Test Low Voltage Outdoor Lighting
Testing low voltage outdoor lighting ensures your system works efficiently and safely. To test properly, you need some essential tools. These tools help identify issues quickly and accurately.
Multimeter
A multimeter is a versatile tool for testing electrical circuits. It measures voltage, current, and resistance. Follow these steps to use a multimeter:
- Set the multimeter to measure voltage.
- Connect the probes to the circuit terminals.
- Read the voltage level on the display.
Use a multimeter to check the voltage at different points in your lighting system. This helps find where the problem lies.
Voltage Tester
A voltage tester is a simpler tool compared to a multimeter. It detects if voltage is present in a circuit. Here’s how to use it:
- Turn on the voltage tester.
- Touch the tester tip to the wire or terminal.
- If the tester lights up, voltage is present.
Voltage testers are great for quick checks. They help verify if power is reaching your outdoor lights.
| Tool | Function | Usage |
|---|---|---|
| Multimeter | Measures voltage, current, and resistance | Detailed testing and diagnostics |
| Voltage Tester | Detects the presence of voltage | Quick verification of power |

Credit: illuminated-gardens.com
2. Safety Precautions: How to Test Low Voltage Outdoor Lighting
Testing low voltage outdoor lighting is simple, but safety is crucial. Proper precautions prevent accidents and ensure a smooth process. Let’s explore key safety measures.
Personal Protection
Always use personal protective equipment (PPE). Wear insulated gloves to avoid electric shocks. Safety glasses protect your eyes from debris or sparks. Closed-toe shoes provide added protection to your feet.
| PPE | Purpose |
|---|---|
| Insulated Gloves | Prevent electric shocks |
| Safety Glasses | Protect eyes from debris |
| Closed-Toe Shoes | Protect feet |
Safe Handling Of Equipment
Ensure all equipment is in good condition. Check wires for frays or damage. Inspect tools for rust or wear. Faulty equipment can cause accidents.
- Check for damaged wires
- Inspect tools for wear and tear
- Ensure equipment is not faulty
Keep a dry work area. Water increases the risk of electric shock. Avoid working in wet conditions. Ensure hands and tools are dry.
Use proper lighting to see clearly. Poor visibility increases risk. Use a flashlight or headlamp if needed.
3. Inspecting The Lighting System: How to Test Low Voltage Outdoor Lighting
Testing your low voltage outdoor lighting is essential. It ensures your system works efficiently and safely. The first step is to inspect the entire lighting setup. This section will guide you through a systematic approach to inspection.
Visual Inspection
Begin with a visual inspection. Look for any obvious signs of damage. Check the lights, wires, and fixtures. Make sure there are no broken or cracked parts. Ensure all lights are positioned correctly. Observe the area for any debris or objects that might obstruct the lights.
| Inspection Point | What to Look For |
|---|---|
| Light Fixtures | Cracks, breaks, proper positioning |
| Wires | Exposed wires, wear and tear |
| Surrounding Area | Debris, obstructions |
Checking Connections
Next, check the connections. Ensure all wires are secure. Loose connections can cause lights to flicker or not work at all. Follow these steps:
- Turn off the power supply.
- Inspect each connection point.
- Tighten any loose wires.
- Replace damaged connectors.
Pay special attention to the transformer. Make sure it is functioning properly. A faulty transformer can affect the entire system. Look at the terminals and ensure they are not corroded.
Remember, regular inspection of your low voltage outdoor lighting keeps it in top condition. It prevents small issues from becoming big problems. Keeping your lighting system well-maintained ensures safety and longevity.
4. Testing Voltage Levels: How to Test Low Voltage Outdoor Lighting
Testing the voltage levels of your low voltage outdoor lighting ensures the system works effectively. This process helps identify any issues with the power supply, transformers, or wiring. By regularly testing voltage, you can maintain optimal lighting performance and increase the lifespan of your lighting fixtures. Here’s how to test voltage levels.
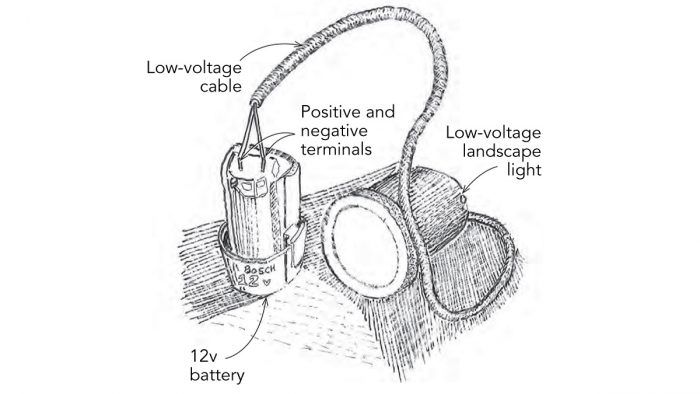
Measuring Voltage Output
To measure voltage output, you need a digital multimeter. First, turn off the power supply to your lighting system. Next, set your multimeter to measure voltage. The appropriate setting usually falls under V or Volts.
Now, connect the multimeter’s probes to the lighting fixture’s terminals. The red probe goes to the positive terminal and the black probe to the negative terminal. Turn the power supply back on and observe the reading on the multimeter. This reading represents the voltage output of your lighting system.
Interpreting Results
Understanding the multimeter readings is crucial. Low voltage lighting systems typically operate between 12V to 15V. If your reading falls within this range, your system is functioning properly.
If the voltage is below 12V, it may indicate a problem. Low voltage can result from long wire runs or poor connections. On the other hand, if the voltage is above 15V, it can damage your lights. High voltage can be caused by an overpowered transformer.
Here’s a simple table to interpret your results:
| Voltage Reading | Interpretation |
|---|---|
| 12V – 15V | Normal |
| Below 12V | Potential Issue |
| Above 15V | Overpowered |
5. Identifying Common Issues
Identifying common issues in low voltage outdoor lighting can save time and money. Simple checks can often resolve many problems. This guide will help you identify the most frequent issues and how to address them.
Faulty Wiring
Faulty wiring is a common issue in outdoor lighting systems. It can cause lights to flicker or not work at all. Regular inspection of the wiring is essential.
| Common Wiring Issues | Symptoms |
|---|---|
| Loose Connections | Lights flicker or go out completely |
| Corroded Wires | Lights dim or fail to turn on |
| Damaged Insulation | Short circuits or sparks |
To check for faulty wiring:
- Inspect all connections for looseness.
- Look for signs of corrosion.
- Examine the insulation for damage.
If you find any issues, repair or replace the affected wires immediately.
Burnt Out Bulbs
Burnt out bulbs are another common problem. They are easy to identify and fix. Follow these steps to check and replace bulbs:
- Turn off the power supply.
- Remove the bulb carefully.
- Inspect the bulb for dark spots or broken filaments.
- Replace it with a new bulb of the same voltage and wattage.
- Turn the power back on and test the light.
Using the correct bulb type is crucial. Always check the manufacturer’s recommendations. Keeping a few spare bulbs on hand can save time during replacements.
6. Troubleshooting Techniques
Testing low voltage outdoor lighting can sometimes be challenging. Using the right troubleshooting techniques can help you identify and fix issues quickly. These techniques ensure your outdoor space remains well-lit and safe.
Isolating The Problem
To begin, isolate the problem area. This can save you time and effort. Follow these steps:
- Check the transformer: Ensure it is working and properly connected.
- Inspect the wiring: Look for any visible damage or loose connections.
- Test individual lights: Replace bulbs one by one to see if the problem persists.
Use a multimeter to measure voltage at different points. This helps pinpoint where the power is lost.
Fixing Common Faults
After isolating the problem, address common faults. Here are some typical issues and their solutions:
| Fault | Solution |
|---|---|
| Loose connections | Secure all connections tightly. Ensure no wires are frayed. |
| Blown fuses | Replace the fuse with one of the same rating. Check for underlying issues. |
| Corroded sockets | Clean the sockets with a wire brush. Apply anti-corrosion spray. |
| Faulty bulbs | Replace with new, compatible bulbs. Ensure the wattage is correct. |
Always double-check your work. This ensures the problem is fully resolved.
7. Maintaining Your Lighting System
Maintaining your low voltage outdoor lighting system ensures longevity and optimal performance. Regular checks and maintenance can prevent issues and save money. Below, we discuss the importance of routine inspections and preventive measures.
Regular Inspections
Regular inspections are vital for your lighting system. Check the lights, cables, and connections every few months. Look for any signs of wear or damage.
Use a voltage meter to ensure each light receives the correct voltage. Low voltage can cause dim lighting, while high voltage can damage the lights.
Inspect the light fixtures for dirt, debris, or water. Clean them with a soft cloth and ensure they are sealed properly. This simple step can extend the life of your lights.
Preventive Maintenance
Preventive maintenance is key to a well-functioning lighting system. Replace bulbs that are dim or flickering. This prevents strain on the system and keeps your space well-lit.
Check and tighten any loose connections in the wiring. Loose connections can cause electrical problems. Use waterproof connectors to protect against moisture.
Consider installing a surge protector to safeguard against voltage spikes. This small investment can save your system from potential damage.
Trim plants and bushes around the lights. Overgrown vegetation can block light and trap moisture. Regular trimming keeps your lights visible and functional.
| Task | Frequency |
|---|---|
| Inspect lights and connections | Every 3 months |
| Clean light fixtures | Every 6 months |
| Replace dim or flickering bulbs | As needed |
| Check for loose connections | Every 3 months |
| Trim surrounding vegetation | Every 6 months |
Credit: www.finehomebuilding.com
Frequently Asked Questions
How Do I Test Low Voltage Outdoor Lighting?
Use a multimeter to check voltage at the transformer and each fixture. Ensure proper connections.
Why Is My Low Voltage Lighting Not Working?
Check for loose connections, damaged wires, or a blown fuse in the transformer. Inspect each part.
Can I Use A Regular Multimeter For Low Voltage Lighting?
Yes, a regular multimeter can measure low voltage. Set it to the appropriate voltage range.
How Often Should I Test My Outdoor Lighting?
Test your outdoor lighting every few months. This ensures it works properly and catches any issues early.
What Tools Do I Need To Test Low Voltage Lighting?
You need a multimeter, wire strippers, and possibly a screwdriver. These tools help check connections and voltage.
Conclusion
Testing low voltage outdoor lighting ensures your system works properly. Follow the steps outlined to check connections and voltage levels. Regular maintenance prevents future problems. This keeps your outdoor space well-lit and safe. Testing helps you identify and fix issues early.
It saves time and money in the long run. Remember, a well-lit yard enhances beauty and security. So, keep your lighting in top shape. Now you can enjoy your outdoor space with peace of mind. Happy lighting!

My name is Mahi Uddin, and I’m a blog writer with over two years of experience specializing in creating engaging, informative content using AI tools. I contribute to InExDecor.com, where I share creative ideas and practical tips for transforming interior and exterior spaces into beautiful, functional environments. With a passion for storytelling and a knack for blending creativity with technology, I strive to craft blogs that not only inform but also inspire readers. When I’m not writing, you can find me exploring design trends or enjoying a good book with a cup of coffee.