Want to make your garden glow at night? Setting up low voltage outdoor lighting is easier than you think.
Low voltage outdoor lighting adds charm and safety to your home. It highlights beautiful garden features, lights up pathways, and creates a warm atmosphere. Many people think it’s complicated, but it’s quite simple. With a few tools and basic steps, you can enhance your outdoor space.
This guide will walk you through setting up low voltage outdoor lighting, making your garden the star of the night. Whether you’re a DIY enthusiast or a beginner, you’ll find these tips easy to follow. Let’s dive into the world of outdoor lighting and transform your garden into a nighttime wonderland.
6 Pro Tips: How to Set Up Low Voltage Outdoor Lighting
1. Choosing The Right Lighting
Choosing the right lighting for your outdoor space is crucial. It affects both aesthetics and functionality. The right lighting can transform your garden or patio. It creates a welcoming ambiance. It also enhances security. Let’s dive into how to choose the right low voltage lights.
Types Of Low Voltage Lights
There are several types of low voltage lights. Each serves different purposes. Path lights illuminate walkways. They guide the way and prevent accidents. Spotlights highlight specific features. They draw attention to statues or plants. Floodlights cover larger areas. They provide broad illumination. Deck lights add a subtle glow. They are great for steps and railings.
Selecting The Perfect Fixtures
Choosing the perfect fixtures is equally important. Consider the style of your home. Match the fixtures to complement it. Think about the material. Durable materials like brass or copper last longer. Plastic fixtures may be less durable. Assess the light output. Ensure it meets your needs. Too dim or too bright can be problematic. Look for adjustable fixtures. They allow for flexibility. Consider energy efficiency. LED lights are a great choice. They consume less power and last longer.
Credit: www.familyhandyman.com
2. Planning The Layout
Planning the layout is a crucial step in setting up low voltage outdoor lighting. A well-thought-out plan ensures optimal lighting for beauty and safety. This process involves mapping out your yard and determining the best places for lights.
Mapping Out Your Yard
Start by sketching a simple map of your yard. Include all key features like trees, pathways, and patios. This map will help visualize where lights are needed. Walk around your yard at dusk. Note the dark spots and areas that need illumination.
Consider the purpose of each light. Do you need to light up a path or highlight a tree? Different purposes require different lighting techniques. Use your map to mark potential light positions. This will make the next steps easier.
Determining Light Placement
Once you have your map, decide where to place each light. Path lights should be spaced evenly along walkways. This ensures safe navigation at night. Place spotlights at the base of trees or near architectural features. Aim them upwards to create dramatic effects.
Think about the direction of the light. Avoid placing lights where they might shine into windows. This can be annoying for you and your neighbors. Instead, focus on areas that enhance the beauty and safety of your yard.
Use a mix of lighting types. Path lights, spotlights, and floodlights all serve different purposes. Combining them creates a balanced and aesthetically pleasing effect. Once you have determined the placement, you are ready to move to the next step.
3. Gathering Necessary Tools
Setting up low voltage outdoor lighting can transform your garden into a magical space. Before starting, gather all necessary tools and materials. This ensures a smooth and stress-free installation process.
Essential Tools And Materials
To begin, you need a few essential tools and materials. Here’s a list:
- Low voltage lights – Choose according to your design.
- Transformer – Converts high voltage to low voltage.
- Low voltage cable – Connects lights to the transformer.
- Shovel – For digging trenches.
- Wire strippers – Strips the cable ends.
- Connectors – Joins cables to lights and transformer.
- Voltage tester – Ensures power is off before working.
Having these tools ready saves time and effort during installation.
Safety Gear
Safety is key when dealing with electrical installations. Always wear the right safety gear:
| Item | Purpose |
|---|---|
| Insulated gloves | Protects hands from electrical shocks. |
| Safety glasses | Shields eyes from debris and light. |
| Work boots | Prevents slips and protects feet. |
| Long sleeves | Protects arms from cuts and scrapes. |
Using the right gear ensures your safety and makes the task easier. Remember, safety first!

Credit: www.familyhandyman.com
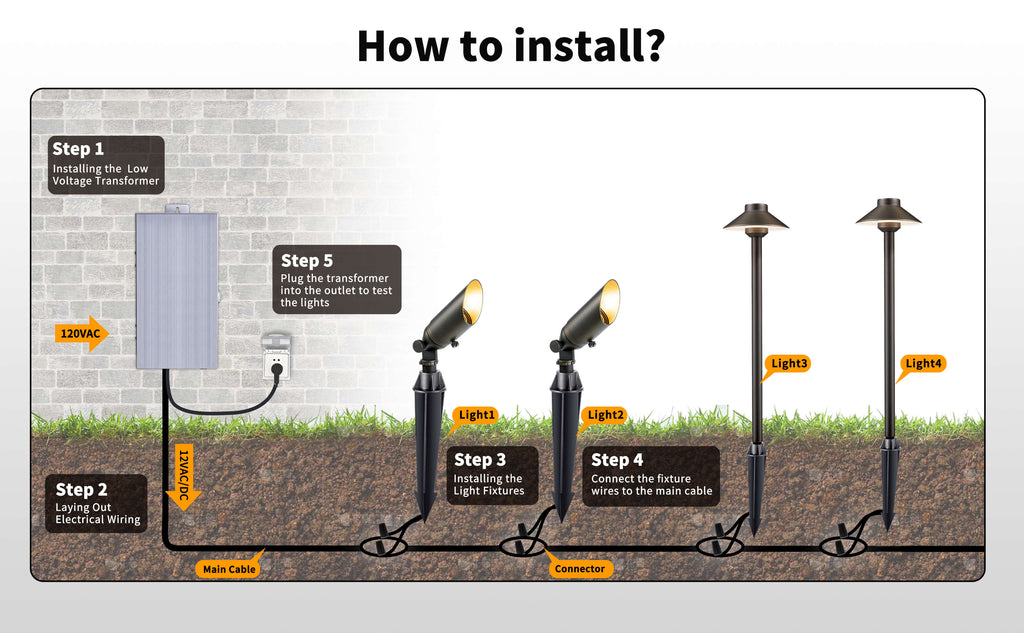
4. Installing The Transformer
Setting up low voltage outdoor lighting enhances the beauty and safety of your garden. A critical step is installing the transformer. This device converts your home’s standard voltage into a lower voltage, suitable for outdoor lighting. Follow these steps to ensure a successful installation.
Choosing A Location
Choose a dry location for the transformer. It should be close to an electrical outlet. Ensure the spot is easy to access for maintenance. A wall near your house or garage is ideal. Avoid places exposed to direct sunlight or heavy rain.
Mounting The Transformer
First, gather your tools. You’ll need a drill, screws, and a screwdriver. Here’s a simple step-by-step guide:
- Mark the mounting points on the wall using the transformer as a template.
- Drill holes at the marked points.
- Insert wall anchors if mounting on a brick or concrete wall.
- Align the transformer with the holes.
- Screw the transformer into place securely.
Ensure the transformer is mounted at least one foot above the ground. This prevents water damage.
| Step | Action |
|---|---|
| 1 | Choose a dry, accessible location. |
| 2 | Mark mounting points on the wall. |
| 3 | Drill holes and insert wall anchors. |
| 4 | Align and screw the transformer in place. |
Once mounted, plug the transformer into the electrical outlet. You are now ready to connect your low voltage lighting system. Always follow safety guidelines when working with electrical components.
5. Laying The Cables
Setting up low voltage outdoor lighting can transform your garden or yard into a magical space. One of the most important steps in this process is laying the cables. This ensures that your lights get the power they need while keeping your outdoor area safe and tidy. Let’s break down how to lay cables for your outdoor lighting system.
Measuring Cable Length
Measuring the length of the cable is the first step. You need to know how much cable you need to connect all your lights to the power source.
- Measure the distance from the power source to each light.
- Add these measurements together.
- Include an extra 10% for slack and adjustments.
Use a tape measure for accurate measurements. Write down the lengths to keep track.
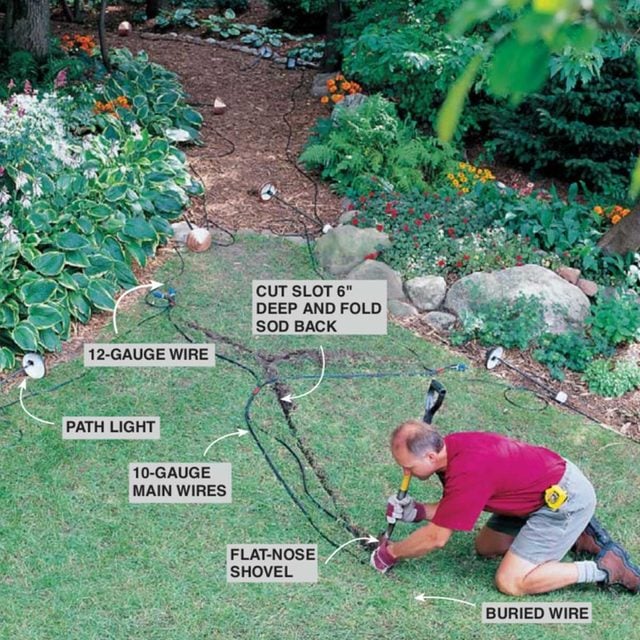
Burying The Cables
Burying the cables keeps them safe from damage and out of sight.
- Dig a trench about 6 inches deep.
- Lay the cable in the trench.
- Cover the trench with soil and pack it down.
Ensure the cables are not stretched too tight. Leave some slack to allow for movement.
You can use a garden spade or a trenching tool. Make sure the trench is deep enough to protect the cable from accidental cuts.
Tip: If you have pets or children, consider placing a protective conduit over the cable before burying it.
Credit: www.gardenreet.com
6. Connecting The Fixtures
Connecting the fixtures is a crucial step in setting up low voltage outdoor lighting. Proper connections ensure your lights work efficiently and last longer. This section will guide you through attaching lights to the cable and securing the connections.
Attaching Lights To The Cable
Start by placing the fixtures where you want them. Lay out the low voltage cable along the path of the lights. Ensure the cable is straight and free from kinks. Attach each light fixture to the cable using connectors. These connectors pierce the cable and make contact with the wires inside. Follow the manufacturer’s instructions for this step. Make sure the connections are tight and secure.
After attaching the lights, check the spacing. Adjust the fixtures if needed. Proper spacing ensures even lighting. Test each connection to make sure the lights turn on. This step helps identify any loose connections or faulty fixtures.
Securing Connections
Once all the fixtures are attached, focus on securing the connections. Use waterproof connectors to protect the connections from moisture. This step is crucial for outdoor lighting. Moisture can cause corrosion and damage the connections. Wrap each connection with electrical tape for added protection. This extra layer helps keep the connections secure and dry.
After securing the connections, bury the cable. Use a shovel to create a shallow trench. Place the cable in the trench and cover it with soil. Ensure the cable is not exposed to avoid tripping hazards. Finally, test the entire system again. Make sure all the lights work properly. Adjust any fixtures if necessary. This final check ensures your outdoor lighting is ready to use.
7. Testing And Adjusting
Once you have installed your low voltage outdoor lighting, testing and adjusting is crucial. This ensures your lights work correctly and look good. This section will guide you through the steps to power up the system and fine-tune light positions.
Powering Up The System
First, connect your transformer to a power source. Flip the switch to turn it on. Check each light to see if it lights up. If a light does not turn on, check the connections. Make sure all wires are secure and tight. Sometimes, a simple adjustment can fix the issue.
Fine-tuning Light Positions
Next, adjust the light positions. Walk around your yard at night. Observe how the lights illuminate your space. Move lights to highlight key features. Ensure pathways are well-lit for safety. Adjust angles to reduce glare and shadows. Take your time to get the perfect setup.
Frequently Asked Questions
What Tools Do I Need For Low Voltage Outdoor Lighting?
You will need a transformer, low voltage cables, connectors, and light fixtures.
How Do I Choose The Right Transformer?
Choose a transformer based on the total wattage of your lights. It should match or exceed it.
Can I Install Low Voltage Lighting Myself?
Yes, it’s safe and easy to install. Just follow the instructions and take your time.
How Deep Should I Bury The Cables?
Bury the cables at least 6 inches deep to protect them from damage.
What Are The Benefits Of Low Voltage Lighting?
Low voltage lighting is energy-efficient, safe, and easy to install. It also enhances outdoor aesthetics.
Conclusion
Setting up low voltage outdoor lighting is simple and rewarding. It enhances your garden’s beauty and safety. Follow the steps carefully for the best results. Choose quality lights and cables. Plan your layout thoughtfully. Connect everything securely. Enjoy the cozy ambiance and improved visibility.
Outdoor lighting transforms your space into a welcoming haven. Start your project today and see the difference it makes. Happy lighting!

My name is Mahi Uddin, and I’m a blog writer with over two years of experience specializing in creating engaging, informative content using AI tools. I contribute to InExDecor.com, where I share creative ideas and practical tips for transforming interior and exterior spaces into beautiful, functional environments. With a passion for storytelling and a knack for blending creativity with technology, I strive to craft blogs that not only inform but also inspire readers. When I’m not writing, you can find me exploring design trends or enjoying a good book with a cup of coffee.