Need to replace stakes for your solar lights? It’s easier than you think.
Solar lights add charm and safety to your garden or pathway. But stakes can break or get lost. Instead of buying new lights, you can make your own replacement stakes. This saves money and reduces waste. In this guide, you’ll learn simple steps to create sturdy, homemade stakes.
Whether you’re a DIY enthusiast or a beginner, this project is straightforward. Follow along to keep your solar lights shining bright. Ready to get started? Let’s dive in!

Credit: sigmaearth.com
How to Make Replacement Stakes for Solar Lights
Materials Needed
You will need a few tools. A hand saw to cut the stakes. A measuring tape to measure the length. Sandpaper to smooth the edges. Drill with a small bit for holes. Screwdriver to attach parts.
Gather all supplies before you start. You need wooden dowels for the stakes. Wood glue to secure parts. Screws for extra strength. Paint if you want to color the stakes. Sealant to protect the wood from weather.

Credit: www.twofeetfirst.net
Choosing The Right Materials
Strong materials last longer. Metal and hard plastic are great choices. Metal stakes resist rust and breakage. Hard plastic is lightweight and easy to use. These materials hold up in bad weather.
Wood and recycled plastic are affordable. Wood is easy to find and cut. Recycled plastic helps the environment. These options save money but may not last as long. Choose cost-effective materials for short-term use.
Preparing The Work Area
Always use safety glasses to protect your eyes. Wear gloves to protect your hands. Ensure the area is well-lit to avoid accidents. Keep sharp tools away from children. Make sure the work area is clean and free of clutter.
Gather all tools before starting. You will need a saw, measuring tape, and sandpaper. Also, have replacement stakes ready. Place everything within easy reach. This saves time and keeps things organized. Work on a flat surface for stability. Keep a trash can nearby for waste.
Measuring And Cutting
Start by measuring the length of the original solar light stake. Cut a replacement from a sturdy, weather-resistant material.
Accurate Measurements
Always use a measuring tape. Ensure the length matches the original stake. Write down the measurements. Double-check to avoid mistakes. Exact numbers are crucial.
Proper Cutting Techniques
Use a fine-tooth saw for clean cuts. Secure the material with clamps. This prevents slipping. Cut slowly to avoid mistakes. Sand the edges after cutting. This ensures a smooth finish.
Assembling The Stakes
Gather all parts first. Check for any damage. Take the main stake. Attach the top piece. Ensure it fits snugly. Push firmly but gently. Do not force it. Twisting can help fit better. Check alignment often. Make sure parts are straight. Secure all connections.
Place the stake in the ground. Choose a soft spot. Press down with hands. Use a mallet if needed. Tap lightly to avoid damage. Ensure the stake is upright. Check stability by shaking gently. Adjust if it wobbles. Press more if needed. Confirm it is secure.

Credit: us.amazon.com
Installing The New Stakes
First, clear any debris from the chosen spot. Push the stake gently into the soil. Make sure it goes in straight. If the ground is hard, moisten it a bit. This makes it easier to insert the stake. Don’t force it too hard. You might break the stake.
Check if the stake is upright. Wiggle it slightly to test its hold. If it moves, add more soil around the base. Press the soil down firmly. This helps keep the stake stable. Ensure it’s firm before placing the solar light on top.
Maintenance Tips
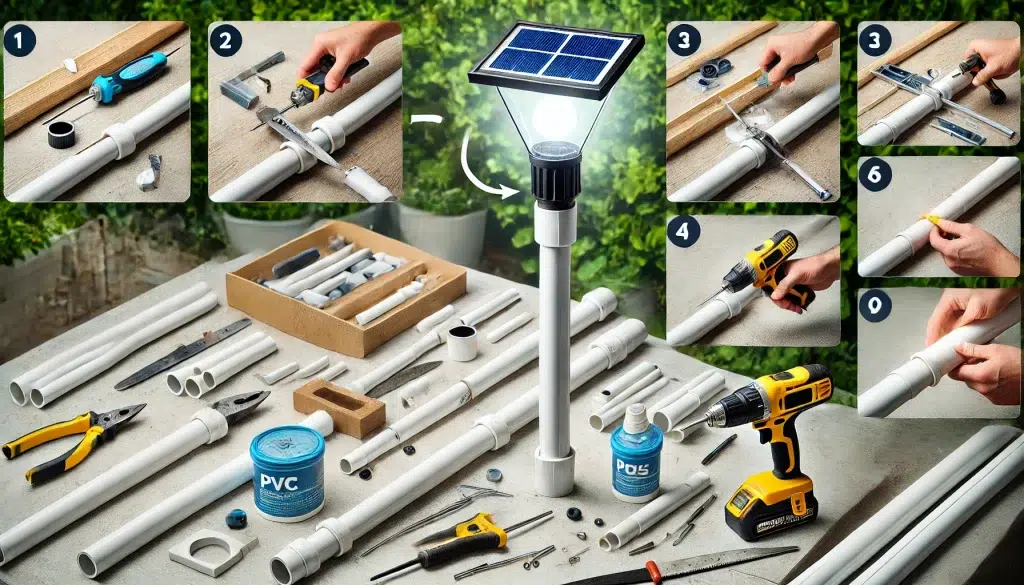
Craft sturdy replacement stakes for solar lights using PVC pipes or wooden dowels. Cut to size, then attach securely with screws. Ensure stability by pressing firmly into the ground.
Regular Inspections
Regular inspections help keep your solar lights working well. Check for dirt or debris on the solar panels. Clean them if needed. Look at the stakes to see if they are damaged. Replace broken stakes right away. Check the lights for water damage. Make sure the lights are still bright. If they seem dim, the batteries might need replacing.
Seasonal Adjustments
Make adjustments to your solar lights with the changing seasons. In winter, ensure the solar panels get enough sunlight. Snow can block the light. Brush off any snow or ice from the panels. During the summer, check for overheating. Shade the lights if needed. Adjust the angle of the panels to catch more sunlight. This helps the lights stay bright all year.
Frequently Asked Questions
How Do You Make Replacement Stakes For Solar Lights?
To make replacement stakes, use PVC pipes or wooden dowels. Cut to desired length. Sand the edges. Insert into the solar light base.
What Materials Are Needed For Replacement Stakes?
You will need PVC pipes, wooden dowels, or metal rods. Also, use sandpaper and a saw for cutting.
Can I Use Wood For Solar Light Stakes?
Yes, wooden dowels work well for replacement stakes. Ensure they are weather-resistant and sanded smoothly.
How Long Should Replacement Stakes Be?
Replacement stakes should match the original length. Typically, they are between 6 to 12 inches long.
Conclusion
Creating replacement stakes for solar lights is straightforward and cost-effective. With basic materials and tools, you can extend the life of your garden lights. This simple DIY project helps maintain your outdoor lighting without much expense. Follow the steps carefully, and enjoy a well-lit garden.
Keep your solar lights shining bright all year round. Happy crafting and lighting!

My name is Mahi Uddin, and I’m a blog writer with over two years of experience specializing in creating engaging, informative content using AI tools. I contribute to InExDecor.com, where I share creative ideas and practical tips for transforming interior and exterior spaces into beautiful, functional environments. With a passion for storytelling and a knack for blending creativity with technology, I strive to craft blogs that not only inform but also inspire readers. When I’m not writing, you can find me exploring design trends or enjoying a good book with a cup of coffee.