Want to enhance your garden? Low voltage outdoor lighting is the way to go.
It’s safe, energy-efficient, and easy to install. In this guide, we’ll show you how to do it yourself. Outdoor lighting can transform your yard into a magical space. You can highlight garden features, improve security, and enjoy nighttime activities. Installing low voltage lighting is a great project for beginners.
It doesn’t require special skills or expensive tools. Plus, it’s a fun way to spend a weekend afternoon. This guide will walk you through the process step-by-step. You’ll learn what materials you need, how to plan your layout, and tips for a successful installation. By the end, your garden will shine brightly, and you’ll feel proud of your handiwork.
Credit: www.gardenreet.com
How to Install Low Voltage Outdoor Lighting
Choosing The Right Lighting
Choosing the right lighting for your outdoor space is crucial. The right lighting can transform your garden, patio, or pathway. It adds beauty and enhances security. Low voltage outdoor lighting is an excellent choice. It is energy-efficient, safe, and easy to install. But, how do you choose the right low voltage lights? Let’s explore.
Types Of Low Voltage Lights
There are various types of low voltage lights. Path lights illuminate walkways and driveways. They create a safe path for walking. Spotlights highlight specific features. Use them to accentuate plants, statues, or fountains. Floodlights provide broad illumination. They are ideal for large areas like backyards. Deck lights are perfect for steps and railings. They ensure safety and add charm to your deck. Choose the type that suits your needs and enhances your space.
Factors To Consider
Several factors play a role in selecting the right lights. First, consider the purpose. Do you need lights for decoration or security? Next, think about the brightness. Low voltage lights come in various brightness levels. Ensure the lights are bright enough for your needs. Another factor is the style. Your lights should match your outdoor decor. Also, consider the installation process. Some lights are easier to install than others. Finally, think about the energy consumption. Low voltage lights are energy-efficient. But, it’s still wise to choose lights with lower energy usage.
Top Pick : Gardencoin Solid Brass Outdoor Landscape Spotlights, 12V Heavy Duty Low Voltage Landscape Lighting, LED Spot Light Fixture Waterproof, Bronze Uplight Without MR16 Bulb (Classic, 12pack)
Planning Your Layout
Planning your layout is a crucial step in installing low voltage outdoor lighting. The right plan ensures even lighting and enhances your outdoor space’s beauty. Let’s break it down into manageable steps.
Assessing Your Space
Start by walking around your yard or garden. Take note of key features like pathways, trees, and patios. Consider where you need light for safety or highlighting. Make a rough sketch of your space. Mark these important areas on your sketch. This helps in visualizing the lighting placement.
Designing The Layout
With your sketch ready, think about the type of lights you need. Path lights work well for walkways. Spotlights are great for trees and bushes. Floodlights can brighten larger areas. Decide the number of lights for each area. Space them evenly to avoid dark spots.
Next, consider the power source location. Plan the routes for the cables. Keep the cables hidden and protected. This keeps the layout clean and safe. Check if you need any additional equipment like connectors or transformers. Write down a list of all needed items.
Once your layout is planned, you are ready to start the installation. Following these steps ensures a smooth and effective lighting setup.
Gathering Necessary Tools
Before installing low voltage outdoor lighting, gather all necessary tools. This preparation ensures a smooth and efficient installation process. Knowing which tools you need helps you avoid unnecessary delays. Below, we will discuss both essential and optional tools.
Essential Tools List
For a successful installation, you need the following tools:
- Wire Strippers: These are crucial for stripping the insulation off wires.
- Screwdrivers: Both flathead and Phillips screwdrivers are needed.
- Shovel or Trowel: You will use this to dig shallow trenches for wires.
- Voltage Tester: This tool ensures the power is off before you start working.
- Electrical Tape: Secure connections and protect exposed wires with this tape.
- Drill: A drill is necessary for mounting fixtures to walls or posts.
- Measuring Tape: Accurate measurements ensure proper placement of lights.
Optional Tools
While not essential, these tools can make your job easier:
- Utility Knife: Useful for cutting tape and opening packaging.
- Wire Connectors: For safe and secure electrical connections.
- Level: Ensures your fixtures are installed straight.
- Hammer: You might need this to drive stakes into the ground.
- Headlamp: Provides hands-free light if you are working in low-light conditions.
Setting Up The Transformer
Setting up the transformer is a crucial part of installing low voltage outdoor lighting. The transformer reduces the high voltage from your home’s power supply to a safer low voltage. This step ensures your outdoor lights operate safely and efficiently.
Selecting A Transformer
Choose a transformer suitable for your lighting needs. Calculate the total wattage of all your lights. Add 20% to this number to find the minimum wattage capacity required. This extra capacity accounts for future expansions.
Consider transformers with built-in timers. Timers allow you to control when your lights turn on and off. Some transformers also come with photocells. Photocells enable your lights to turn on at dusk and off at dawn automatically.
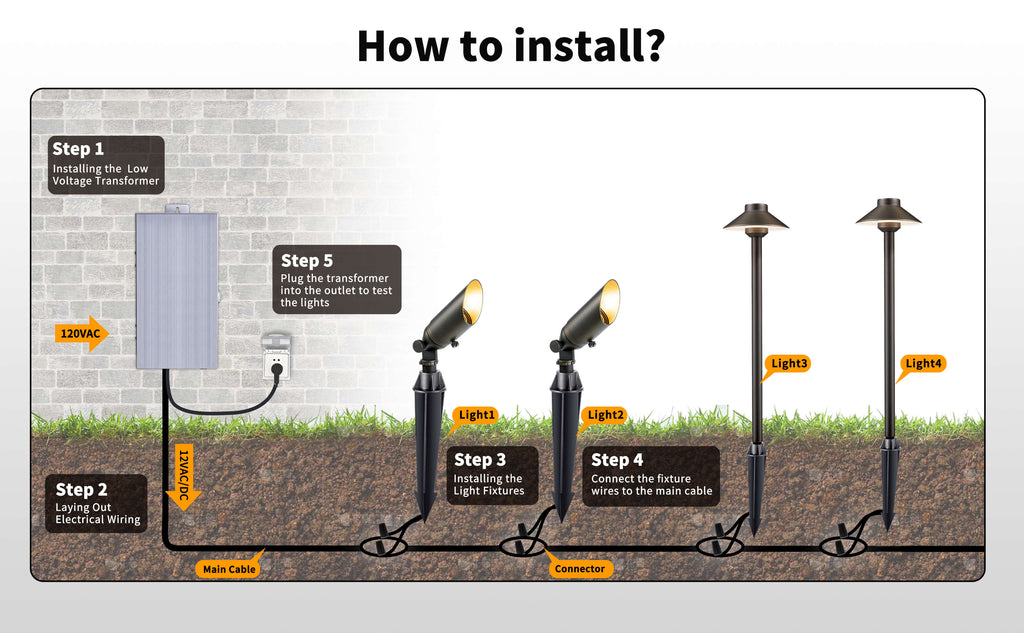
Installing The Transformer
Install the transformer near a power source. The location should be close to the lights for easier wiring. Mount the transformer on a wall or post at least one foot above the ground. This height protects it from water damage.
Use screws to secure the transformer. Make sure it is firmly attached. Connect the transformer to the power source using the provided plug. Ensure the power is off before making any connections.
Next, connect the low voltage wires to the transformer. Strip half an inch of insulation from the wire ends. Insert the wires into the transformer’s terminals. Tighten the screws to secure the wires. Check the connections to ensure they are tight.
Once connected, turn on the power. Test the transformer to see if it works correctly. Your low voltage outdoor lighting system is now ready for the final wiring and placement of lights.
Running The Wires
Running the wires for your low voltage outdoor lighting can seem like a daunting task, but it doesn’t have to be. With the right planning and some simple steps, you can easily run the wires to connect your lights. This section will guide you through the process, focusing on the key aspects you need to consider.
Choosing Wire Gauge
The first step in running wires is choosing the right wire gauge. Wire gauge refers to the thickness of the wire. For low voltage lighting, you typically use 12, 14, or 16-gauge wire. The distance from the transformer to the lights determines the wire gauge you need.
- 12-gauge wire is suitable for runs up to 100 feet.
- 14-gauge wire is good for runs between 50 to 100 feet.
- 16-gauge wire works well for runs less than 50 feet.
Using the correct wire gauge ensures that your lights receive enough power and operate efficiently.
Laying Out The Wires
Once you have the right wire gauge, it’s time to lay out the wires. Start by planning where you want to place your lights. Lay the wire on the ground, following the planned route. This helps you visualize the setup and make adjustments if needed.
When laying out the wires, follow these tips:
- Keep the wire straight to avoid unnecessary bends.
- Leave some extra wire at each light fixture for adjustments.
- Make sure the wire is hidden from view.
If you need to cross pathways, bury the wire a few inches deep to protect it. Use plastic conduit for added protection. This will help prevent damage from foot traffic or garden tools.
By planning and laying out the wires carefully, you ensure a neat and efficient installation. Taking these steps will help you get your outdoor lighting project off to a great start.

Credit: www.mrgutterlimited.com
Connecting The Lights
Low voltage outdoor lighting enhances your yard’s beauty and security. Connecting the lights is an essential step. Follow these instructions to ensure a smooth and safe installation process.
Attaching Lights To Wires
Before attaching lights to wires, plan the layout. Make sure the transformer is unplugged during this step.
Start by stripping about 1/2 inch of insulation from the wires. This allows for a good connection. Use a wire stripper tool for this step.
Next, connect the light fixture wires to the main cable. Twist the wires together tightly. Ensure the connections are secure.
It’s best to use wire nuts or connectors. These help protect the connections from moisture.
Securing Connections
After attaching the lights, secure all connections. This prevents disruptions in the power flow.
Use electrical tape to wrap around the wire nuts. This provides extra protection against moisture and weather.
Consider using waterproof connectors. These add an extra layer of safety.
Finally, test the connections. Plug in the transformer and switch on the lights. Check each light to ensure they are working properly.
If any lights do not work, recheck the connections. Ensure the wires are securely twisted and the connections are tight.
Following these steps ensures a secure and efficient installation of your low voltage outdoor lighting.
Testing And Adjusting
Once you have installed your low voltage outdoor lighting, the next step is to test and adjust the system. This ensures everything works properly and looks as intended. Proper testing and adjustments can make a significant difference in the final appearance of your outdoor lighting setup.
Testing The System
Turn on the power source to your low voltage lighting. Check each light to ensure it turns on. Walk around your yard and observe the lights from different angles. This helps you see if they are illuminating the right areas. If a light does not turn on, check the connections and wiring.
Make sure the lights are bright enough. You want enough light to illuminate pathways and key features. If the lights are too dim, you may need to use higher wattage bulbs or adjust the placement. Also, check the timer or photocell settings to ensure the lights turn on and off at the correct times.
Making Adjustments
Adjust the angle of each light. Point them to highlight specific features like trees, statues, or pathways. You may need to move the lights closer or farther from the objects they illuminate. This helps create the desired effect and avoid dark spots.
Check the light spread. Ensure it covers the intended area without being too harsh. You can use shields or diffusers to soften the light. Make small adjustments and check the results each time. This process may take a few tries to get perfect, but the effort is worth it.
Finally, secure all connections and wiring. Ensure they are safe and protected from the elements. Proper testing and adjustments will help your low voltage outdoor lighting system shine brightly and beautifully.

Credit: www.youtube.com
Frequently Asked Questions
What Tools Are Needed To Install Low Voltage Outdoor Lighting?
You will need a transformer, low voltage wire, light fixtures, wire strippers, and connectors.
How Do You Plan The Layout For Outdoor Lighting?
Plan the layout by marking where you want each light. Ensure even spacing and avoid dark spots.
How Deep Should Low Voltage Wires Be Buried?
Bury low voltage wires about 6 inches deep to protect them from damage.
What Are The Safety Precautions When Installing Outdoor Lighting?
Turn off the power before working. Use waterproof connectors and ensure all wires are secure.
How Do You Connect Low Voltage Lights To The Transformer?
Connect the light fixture wires to the transformer using wire nuts or connectors. Ensure a tight connection.
Conclusion
Installing low voltage outdoor lighting enhances your home’s beauty and safety. It’s an easy project that you can complete with basic tools. Follow the steps carefully, and you’ll enjoy a well-lit yard. Remember to plan your layout and check all connections.
Test your lights before final installation. With patience, you can transform your outdoor space. Enjoy your new lighting and the ambiance it brings. Happy lighting!

My name is Mahi Uddin, and I’m a blog writer with over two years of experience specializing in creating engaging, informative content using AI tools. I contribute to InExDecor.com, where I share creative ideas and practical tips for transforming interior and exterior spaces into beautiful, functional environments. With a passion for storytelling and a knack for blending creativity with technology, I strive to craft blogs that not only inform but also inspire readers. When I’m not writing, you can find me exploring design trends or enjoying a good book with a cup of coffee.