Connecting low voltage outdoor lighting is easy and rewarding. It enhances your garden’s beauty and safety.
Installing outdoor lighting may seem daunting. But with the right steps, anyone can do it. Low voltage lighting is safe and energy-efficient. It creates a warm, inviting atmosphere. This guide will help you connect your lights quickly and easily. No need for professional help.
You’ll learn what tools you need and how to set up your lights. From preparing the area to making the final connections, every step will be covered. Ready to transform your outdoor space? Let’s dive into the process of connecting low voltage outdoor lighting.
Introduction To Low Voltage Outdoor Lighting
Connecting low voltage outdoor lighting is straightforward and safe. Start by selecting the right transformer and wiring. Ensure all connections are secure and weatherproof for optimal performance.
Low voltage outdoor lighting is a popular choice for many homeowners. It uses less electricity than traditional lighting. This type of lighting is safe and easy to install.
Low voltage lighting systems use a transformer to reduce the standard 120-volt power to 12 volts. This makes the lighting system more energy-efficient. It also reduces the risk of electrical shocks.
Outdoor lighting can enhance the beauty of your garden. It can also improve the security of your home. With low voltage lighting, you can create a warm and inviting atmosphere.
Benefits Of Low Voltage Lighting
Low voltage lighting offers several benefits. First, it is energy-efficient. Using less power means lower electricity bills.
Second, it is safe. The low voltage reduces the risk of electrical shocks. This makes it ideal for families with children.
Third, it is easy to install. You do not need to hire an electrician. Most systems come with simple instructions.
Fourth, it is versatile. You can use it to highlight garden features. Or to light pathways and driveways.
Common Applications
Low voltage lighting has many common applications. One popular use is garden lighting. It can highlight trees, shrubs, and flowers.
Another common application is pathway lighting. This helps to guide visitors to your front door. It also adds an element of safety.
You can also use low voltage lighting for deck and patio areas. It creates a warm and inviting space for outdoor gatherings.
Lastly, it can be used to enhance security. Lighting dark areas around your home can deter potential intruders.

Credit: www.mrgutterlimited.com
Planning Your Outdoor Lighting
Creating a perfect outdoor lighting setup starts with a good plan. Before you dive into the wiring and installation, take some time to plan your layout. This ensures your lighting is both functional and beautiful. Let’s break down the steps to help you get started.
Assessing Your Space
Begin by assessing your outdoor space. Walk around your yard and note down areas that need lighting. Think about pathways, gardens, and entertainment areas. You might also want to highlight specific features like trees or water elements.
Use a simple sketch of your yard. Mark all the spots where you want lights. This visual aid helps you understand the scope of your project. Consider the power sources available. Note where you have outlets or need to install new ones.
Choosing The Right Fixtures
Choosing the right fixtures is crucial. Different areas require different types of lighting. Here are some common types:
- Path Lights: Ideal for illuminating walkways and driveways.
- Spotlights: Perfect for highlighting trees or architectural features.
- Floodlights: Best for large areas like backyards or gardens.
- Deck Lights: Excellent for steps, railings, and patios.
Consider the style and color of your fixtures. Ensure they complement your outdoor decor. Choose fixtures that are weather-resistant and durable. LED lights are energy-efficient and long-lasting. They are a great choice for outdoor lighting.
Now that you have a plan, you’re ready to move on to the next step. With your assessment and fixture choices, you are set for a stunning outdoor lighting setup.
Gathering Necessary Materials
To successfully connect low voltage outdoor lighting, gathering the necessary materials is key. You’ll need specific tools and equipment, as well as lighting components. This ensures the installation process goes smoothly and your outdoor space is beautifully lit.
Tools And Equipment
First, gather the essential tools. A wire stripper will help you remove insulation from wires. Wire cutters are needed to trim wires to the right length. A screwdriver will come in handy for securing connections. For safety, wear gloves to protect your hands. Lastly, a voltage tester checks connections before powering the system.
Lighting Components
Next, collect the lighting components. You’ll need low voltage lights suitable for outdoor use. A transformer is crucial to convert high voltage to low voltage. Make sure to have low voltage wire to connect the lights to the transformer. Waterproof connectors keep your connections safe from the elements. Finally, a timer or photocell can automate your lighting system.
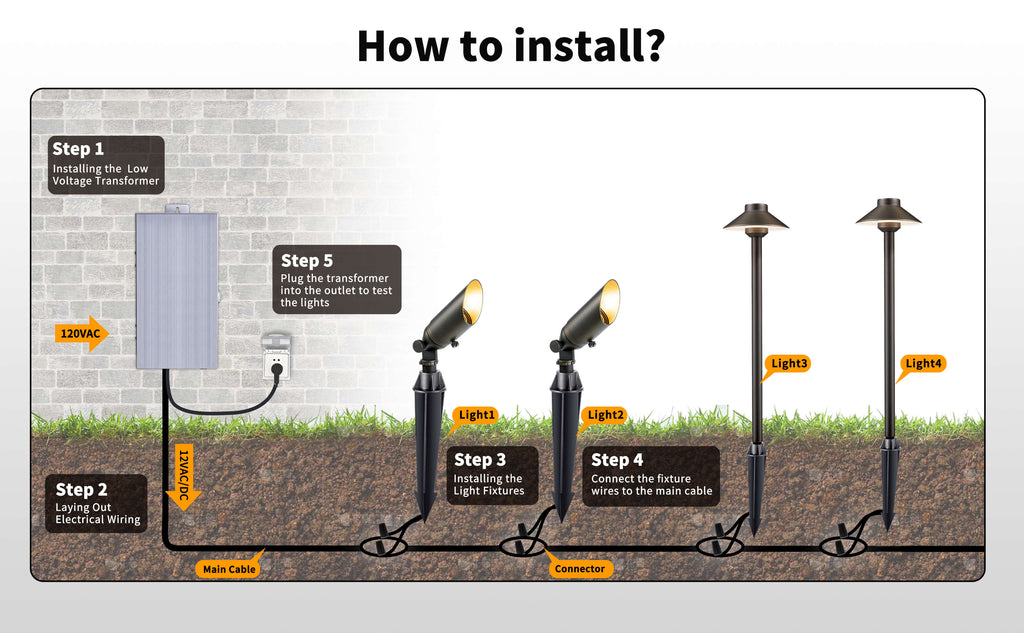
Installing The Transformer
Installing the transformer is a crucial step in connecting low voltage outdoor lighting. It converts standard household current to a safer, low voltage level. This ensures that your outdoor lights operate safely and efficiently.
Selecting A Location
Selecting the right location for your transformer is vital. Choose a spot near a power source, such as an external outlet. The location should be dry and well-ventilated. Avoid areas prone to flooding or direct sunlight. This ensures the transformer stays cool and operates efficiently.
| Location | Reason |
|---|---|
| Near a power source | Easy connection to electricity |
| Dry and ventilated | Prevents overheating and damage |
| Avoid direct sunlight | Keeps transformer cool |
Mounting The Transformer
After selecting a location, the next step is mounting the transformer. Use screws to secure the transformer to a wall or a post. Ensure it is at least 12 inches above the ground. This prevents water damage and keeps it accessible for maintenance.
- Mark the mounting points on the wall.
- Drill holes at the marked points.
- Insert wall anchors if needed.
- Secure the transformer with screws.
Once mounted, connect the transformer to the power source. Use a weatherproof cover for the outlet. Ensure all connections are tight and secure. This prevents any electrical hazards and ensures your lighting system works efficiently.
Laying Out The Cables
Connecting low voltage outdoor lighting involves more than just plugging in lights. One of the most important steps is laying out the cables. This ensures your lights work properly and last longer. Below are detailed tips and common mistakes to avoid.
Cable Placement Tips
- Plan the route: Sketch out where you want to place your lights and map the route for your cables. This avoids unnecessary digging.
- Measure distances: Measure the distance between each light and the power source. This ensures you have enough cable.
- Avoid obstacles: Bury cables away from large roots and rocks to prevent damage.
- Use connectors: Use waterproof connectors to join cable segments. This protects the connections from moisture.
Avoiding Common Mistakes
- Overloading the circuit: Ensure the total wattage of your lights does not exceed the transformer’s capacity.
- Shallow burial: Bury cables at least 6 inches deep to avoid damage from lawn equipment.
- Loose connections: Make sure all connections are tight. Loose connections can cause flickering lights or failure.
- Ignoring voltage drop: Use thicker cables for long distances to reduce voltage drop and maintain light brightness.
| Common Mistake | Solution |
|---|---|
| Overloading the circuit | Check total wattage against transformer capacity |
| Shallow burial | Bury cables at least 6 inches deep |
| Loose connections | Ensure all connections are tight |
| Ignoring voltage drop | Use thicker cables for long runs |
Following these tips and avoiding common mistakes will ensure your low voltage outdoor lighting works efficiently and lasts for years. Your garden will look stunning, and you’ll feel great knowing the job was done right.

Credit: www.youtube.com
Connecting The Lights
Connecting the lights in your low voltage outdoor lighting system is a crucial step. Proper connections ensure that your lights function efficiently and safely. This guide will walk you through the process of wiring the fixtures and ensuring secure connections.
Wiring The Fixtures
First, gather all necessary tools and materials. You’ll need a wire stripper, electrical tape, connectors, and the low voltage wire. Follow these steps to wire the fixtures:
- Strip about 1/2 inch of insulation from the ends of the low voltage wire.
- Connect the stripped wire ends to the terminals on the light fixture.
- Use wire nuts or other connectors to secure the connections.
- Wrap the connections with electrical tape for added protection.
Make sure each connection is tight to avoid any loose wiring issues.
Ensuring Secure Connections
Secure connections are vital for the longevity and safety of your lighting system. Here’s how to ensure your connections are secure:
- Double-check each connection to make sure they are tight and secure.
- Use waterproof connectors if your lighting is exposed to the elements.
- Inspect the connections regularly to ensure they remain secure over time.
By following these steps, you ensure your low voltage outdoor lighting system works efficiently and safely.
Testing And Adjusting
After installing low voltage outdoor lighting, the next critical step is testing and adjusting the setup. Proper testing ensures that each fixture is correctly positioned and functioning as expected. Adjustments may be necessary to achieve the desired lighting effect and coverage. Here’s how to test and adjust your low voltage outdoor lighting system efficiently.
Checking For Proper Function
First, turn on the power to the lighting system. Check each light fixture to ensure it is working.
- Verify that all lights are illuminated.
- Observe the brightness and color temperature.
- Check for flickering or inconsistent lighting.
If a light is not working, inspect the connections and ensure the wires are secure. Use a voltage meter to check for power at each fixture. If there is no power, trace the wiring back to the transformer to identify any issues.
Making Final Adjustments
Once all lights are functioning, make any necessary adjustments to the positioning and angles of the fixtures. This step is crucial for achieving the desired lighting effect.
- Adjust the angle: Point the lights to highlight specific areas.
- Check for shadows: Make sure there are no unwanted dark spots.
- Ensure coverage: Spread the light evenly across the area.
Use a table to keep track of your adjustments:
| Fixture | Initial Position | Final Position | Notes |
|---|---|---|---|
| Pathway Light 1 | Pointed down | Pointed slightly up | Better coverage |
| Spotlight 2 | Facing left | Facing right | Highlights tree |
After making these adjustments, step back and review the overall lighting effect. Ensure that the lights create a welcoming and well-lit environment. If needed, tweak the angles and positions further to perfect the look.
Credit: www.gardenreet.com
Frequently Asked Questions
How Do You Connect Low Voltage Outdoor Lights?
First, turn off the power. Connect wires to the transformer. Attach lights to the wire.
What Tools Are Needed For Low Voltage Lighting?
You need a transformer, low voltage lights, wire strippers, and connectors. Basic tools.
How Deep Should Low Voltage Lighting Wire Be Buried?
Bury the wire at least 6 inches deep. Prevents damage.
Can Low Voltage Lights Be Connected To A Timer?
Yes, connect to a timer. Automates lighting. Saves energy.
How Many Lights Can A Low Voltage Transformer Handle?
Check the transformer’s wattage rating. Sum of lights’ wattages should be below this.
Conclusion
Connecting low voltage outdoor lighting can be simple and rewarding. Follow the steps carefully for a safe installation. Check all connections to ensure they are secure. Test the lights before finalizing. Enjoy the ambiance and security provided by your new lighting.
Remember to maintain your system regularly. This will ensure long-lasting performance and safety. With a little effort, your outdoor space will shine beautifully. Happy lighting!

My name is Mahi Uddin, and I’m a blog writer with over two years of experience specializing in creating engaging, informative content using AI tools. I contribute to InExDecor.com, where I share creative ideas and practical tips for transforming interior and exterior spaces into beautiful, functional environments. With a passion for storytelling and a knack for blending creativity with technology, I strive to craft blogs that not only inform but also inspire readers. When I’m not writing, you can find me exploring design trends or enjoying a good book with a cup of coffee.