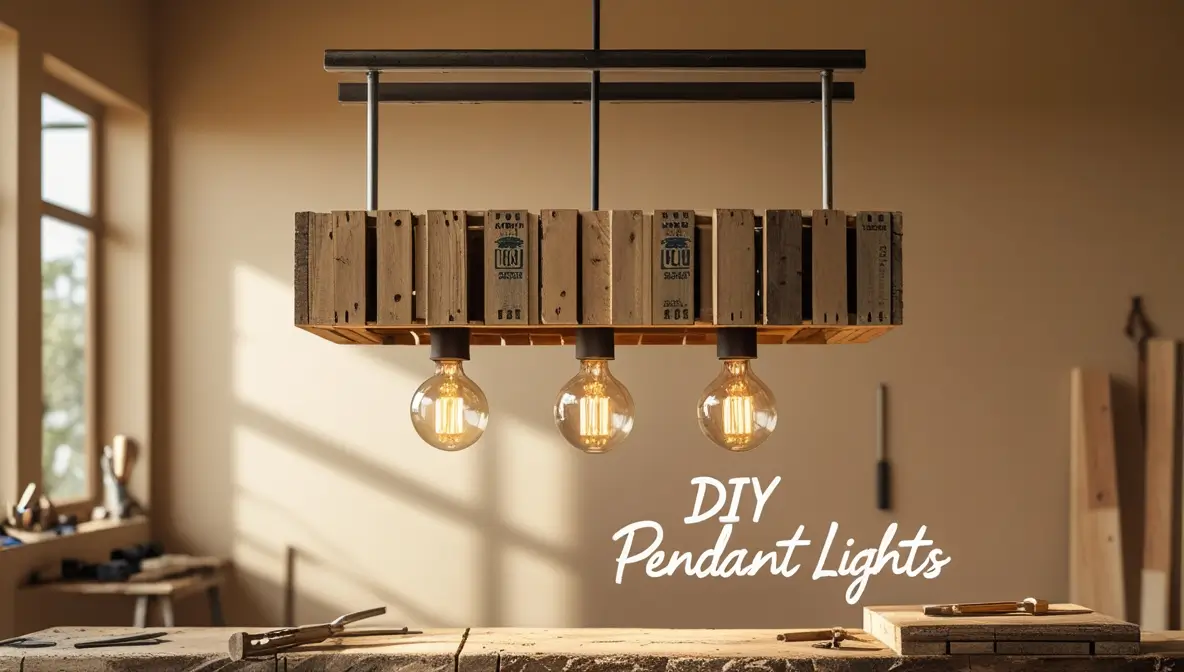
Do It Yourself Pendant Lights? Pendant lights can transform any room. They add style and light.
But buying them can be costly. The good news? You can make your own pendant lights at home. Creating DIY pendant lights is easier than you think. With a few materials and some creativity, you can design lights that fit your personal style.
This project not only saves money but also gives your space a unique touch. Whether you prefer a rustic look or a modern feel, you can customize your lights to match your decor. Ready to get crafty? Let’s explore how you can create stunning pendant lights yourself.
Introduction To DIY Pendant Lights
Pendant lights hang from the ceiling. They are like small, pretty lamps. You can put them in any room. They give a nice touch to your home. Pendant lights come in many shapes and sizes. Some are round, others are square. Many people love the soft light they give. They make spaces look warm and cozy. Pendant lights are very popular. They are both useful and beautiful.
Making your own pendant lights is fun. It saves money too. You can choose any design you like. This makes your home unique. You feel proud of your work. DIY projects make great gifts. Friends and family will love them. Building things with your hands is very satisfying. It’s a good way to spend free time.
Choosing The Right Materials
Selecting sustainable options is key to creating eco-friendly lights. Bamboo and recycled glass are great choices. These materials are renewable and reduce waste. Bamboo is strong and light. Recycled glass adds a unique touch. You can also use cork. It is biodegradable and stylish.
Building pendant lights on a budget is possible. Use PVC pipes or tin cans. These are cheap and easy to find. PVC pipes can be painted. Tin cans can be decorated. Wood scraps are another option. They are often free from local shops. Reusing old items saves money. It also adds character to your lights.
Design Inspirations
Pendant lights can add a sleek, modern look to any room. Use geometric shapes like triangles or hexagons for a fresh feel. Metal finishes are popular, adding a touch of elegance. Consider using clear glass to showcase the bulb. This creates a bright, open space. Minimalist designs work well in modern homes. They focus on simplicity and clean lines. LED bulbs are energy-efficient and long-lasting.
Vintage pendant lights bring a warm, nostalgic feel. Edison bulbs are perfect for this style. They have a unique, old-fashioned glow. Antique brass and rustic wood finishes add charm. Mason jars can be repurposed into pendant lights. This gives a cozy, farmhouse vibe. Fabric cords in bright colors can add a playful touch. Vintage styles often mix well with modern elements. This creates a unique, eclectic look.
Basic Tools to Install a Pendant Light

A pendant light can do wonders for the space of your room. But you’ll need the right tools to get started for a smooth installation. A comprehensive list of the essential tools you need to get the job done is here:
- Drill & Drill Bits: You’ll need a drill to create holes on the ceiling to install the mounting bracket or canopy. Choose correct drill bits considering the ceiling material.
- Screwdriver: This tool is essential for driving screws to attach the pendant light fixture and its parts to the ceiling.
- Wire Strippers: These are used to strip the insulation off electrical wires before you make the connections. It guarantees that the wiring is safe and effective.
- Measuring Tape: It’s essential that the measurements are precise so that the light fixture is correctly positioned. A tape measure enables you to space your pendant light appropriately.
- Screws & Wall Anchors: You will need screws for fastening the fixture to the ceiling, and wall anchors to secure it well in drywall or plaster.
- Wire Nuts: These are used to twist and secure electrical connections. There are a few exceptions that may leave you withdrawing cash, but safety pays.
- Cable ties: These handy devices can be used to keep cables secure and neatly organized, preventing tangling and potential tripping hazards.
- Pliers: Pliers are handy for gripping, twisting, and holding wires as they are being installed and are needed for the job.
- Level: You’ll want your pendant light to hang straight, and a level ensures that you get that professional-looking finish.
- Safety Glasses: These protect your eyes from flying debris and dust created during the installation process.
- Work Gloves: Protect your hands from sharp edges and accidental injuries during the project with work gloves.
Follow 9 Steps to Install Your Pendant Light

To make sure that you can install your own pendant light safely and effectively, follow this detailed step-by-step guide: Having the appropriate tools and planning correctly will ensure that a beautifully illuminated space is a short time away.
1. Clear the Space & Collect the Right Tools
Before you start, clear the space where you will work. You also want to make sure you have good, direct light in the space and that your tools are easy to access. Prepare your pendant light kit, screwdriver, ladder, measuring tape, and the rest of the equipment and materials you will need (if applicable).
2. Turn Off the Power Supply
When it comes to working with electricity, safety is vital. Because this type of repair involves electricity, turn off the power to the room at the breaker box to eliminate any chance of electric shock. Use a voltage tester to check that the dull along the wires is turned off.
3. Set Up Your Workspace
Throw down a drop cloth so that anything that may fall off during the install, such as debris or small parts, can go there. So, keep your workplace clean because the more cleaner your environment the more organized you work throughout the project.
4. Unbox the Pendant Light Kit
Unpack your pendant light kit slowly, taking care to read through the manufacturer’s instructions. Unpack everything, and spread out all the parts on a table. This will allow you to see exactly what you will have installed.
5: Measure and Mark the Installation Area
Pull out the measuring tape and measure the space where the pendant light is going to hang. Puncture the ceiling at the desired location of the light fixture. Then comes the most crucial step of making sure that placement and symmetry are spot on.
6: Wire the Pendant Light Fixture
The wires are often color-coded, based on the manufacturer’s wiring diagram, so connect according to the colors, if so. Connect the wires to the fixture, ensuring that the live (black), neutral (white) and ground (green or copper) wires, are wired correctly. You want to use wire nuts and make sure the connections are tight and safe.
7. Installing the Canopy or Mounting Bracket
Step 2: Using screws and wall anchors, mount the bracket or canopy to the ceiling. Make sure that the fixture is secured well, and use a level to take care that it is aligned straight.
8. Double-Check All Attachments
Double-check all attachments and connections to ensure everything is tight and secure, then turn the power back on. Ensure that no wires are exposed and that the fixture is properly mounted.
9. Restore Power and Test the Light
After you’ve confirmed everything is tightly secured, restore power to your home at the breaker box. Test the pendant light to ensure it’s working properly, and then adjust the fixture as needed.
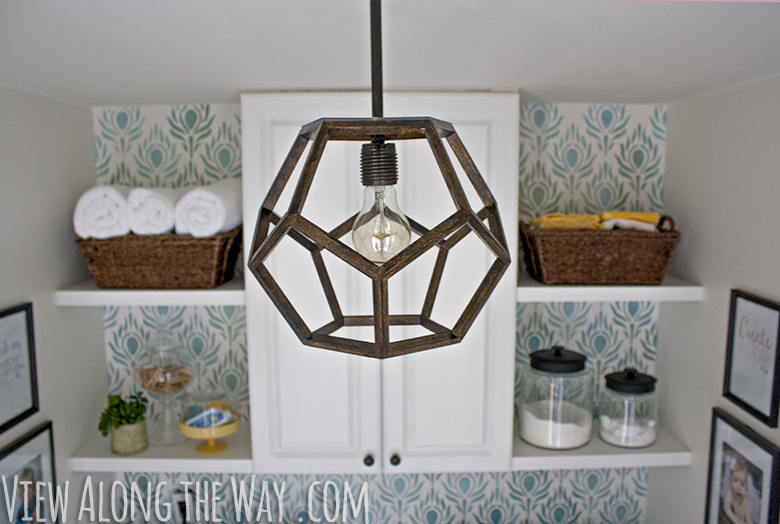
Credit: www.viewalongtheway.com
Safety Tips
Turn off the power at the main switch. Use a voltage tester to check. Ensure no electricity flows through the wires. Never work with wet hands or near water. Wear rubber-soled shoes for extra safety.
Read the instructions carefully. Follow each step exactly. Use a sturdy ladder for reaching high places. Screw in the pendant light securely. Check that it hangs straight. Test the light before finalizing the setup.
Creative Ideas
Turn old jars into beautiful pendant lights. Simply clean the jars well. Then, drill a hole in the lid for the light fixture. This idea is easy and cost-effective. It also gives your home a unique look.
Use a colander for a fun kitchen light. Paint it if you want. The holes will create interesting light patterns. This idea is both creative and practical. You can also use baskets, bowls, or even old toys.
Wood slices make great bases for lights. Sand them smooth first. Then, drill a hole for the fixture. This adds a rustic charm to any room. It’s simple and beautiful.
Shells can also be used for pendant lights. Choose large, sturdy shells. Drill a hole for the light. These look great in beach-themed rooms. Natural elements can make your home feel cozy and warm.
Maintaining Your Pendant Lights
Always turn off the light before cleaning. Use a soft cloth to wipe down the pendant. For stubborn spots, mix water and mild soap. Gently scrub the area. Avoid using harsh chemicals. These can damage the light’s finish. Dry the pendant completely to prevent rust.
If the light flickers, check the bulb. Make sure it is tight. If that does not work, inspect the wiring. Loose connections can cause flickering. Another issue could be a faulty switch. Replace it if needed. For humming sounds, use a different bulb. Sometimes bulbs can be noisy. If problems persist, consult an electrician.
Showcasing Your Work
Good lighting is key for great photos. Use natural light when possible. Position your pendant light in a bright room. Avoid direct sunlight. It can cause harsh shadows.
Use a plain background. This helps your pendant light stand out. Keep the camera steady. Use a tripod if you can. Take photos from different angles. Close-up shots show details. Wide shots show the whole light in the room.
Share your photos on social media. Platforms like Instagram and Pinterest are great. Write a short description for each photo. Mention the materials you used. Share any challenges you faced. Your followers will love the story behind your work.
Engage with your audience. Reply to comments. Ask for feedback. This creates a community around your work. More people will see and share your posts. This helps you gain more followers.

Credit: www.homedit.com

Credit: www.youtube.com
Frequently Asked Questions
What Tools Are Needed For Diy Pendant Lights?
You need basic tools like a drill, wire cutters, and a screwdriver. Additionally, use a measuring tape and ladder for installation.
How To Choose The Right Pendant Light Style?
Consider your room’s decor and lighting needs. Match the pendant light’s design with your existing style for a cohesive look.
Can I Install Pendant Lights Myself?
Yes, with basic electrical knowledge, you can install pendant lights yourself. Always follow safety guidelines and turn off electricity.
What Materials Are Best For Diy Pendant Lights?
Popular materials include metal, glass, and wood. Choose materials that match your room’s decor and are easy to work with.
Conclusion
Creating your own pendant lights can be fun and rewarding. You get to personalize your space. Plus, it’s cost-effective. No need for expensive store-bought fixtures. With a few tools and materials, you can craft something unique. Try different designs and materials.
Experiment with colors and shapes. Enjoy the process and the result. Your home will feel more personal. DIY pendant lights add a touch of creativity. So, gather your supplies and get started. Your custom lighting awaits!

My name is Mahi Uddin, and I’m a blog writer with over two years of experience specializing in creating engaging, informative content using AI tools. I contribute to InExDecor.com, where I share creative ideas and practical tips for transforming interior and exterior spaces into beautiful, functional environments. With a passion for storytelling and a knack for blending creativity with technology, I strive to craft blogs that not only inform but also inspire readers. When I’m not writing, you can find me exploring design trends or enjoying a good book with a cup of coffee.