Hooking up low voltage outdoor lighting can transform your yard. It’s easier than you think.
Low voltage lighting adds beauty and safety to your outdoor space. With just a few steps, you can install it yourself. This guide will show you how to set up your lighting quickly and safely. Whether you want to light up your garden, walkway, or patio, low voltage lights are a great choice.
They are energy-efficient and easy to install. You don’t need to be an expert to do it. Just follow these simple instructions, and you’ll have a beautifully lit yard in no time. Ready to get started? Let’s dive in and brighten up your outdoors!

Credit: www.youtube.com
How to Hook Up Low Voltage Outdoor Lighting: 7 Pro Tips
1. Planning Your Outdoor Lighting
Easily hook up low voltage outdoor lighting by connecting the transformer to a power source and running cables to the lights. Ensure the connections are secure to prevent any electrical issues. Enjoy a beautifully lit outdoor space.
Planning your outdoor lighting is an important step. This ensures your space is well-lit and looks great. Start by thinking about where you need light. This helps you decide the type and number of lights to buy.
Choosing The Right Lights
You have many options for outdoor lights. Pathway lights are perfect for guiding guests. Spotlights highlight specific features like trees or statues. Floodlights brighten larger areas. Solar lights are energy-efficient and easy to install. LED lights last longer and save energy. Think about the style and finish of the lights. Match them with your outdoor decor.
Mapping Out Your Space
Begin by drawing a simple map of your yard. Mark where you want lights. Think about the purpose of each light. For pathways, mark the route. For spotlights, mark the features you want to highlight. Measure the distances between points. This helps in planning wire lengths. Keep in mind the power source location. Make sure your lights are not too close to each other. This avoids over-illumination and saves energy.
By planning ahead, you can create a beautiful and functional outdoor lighting setup. Happy lighting!
2. Gathering Necessary Tools And Materials
Before starting your low voltage outdoor lighting project, gather all the necessary tools and materials. This preparation will save time and ensure the installation goes smoothly. Below, we will cover the essential tools and required materials you need.
Essential Tools
To begin, you will need a few essential tools. These tools are easy to find and will help you complete the installation efficiently.
- Screwdriver: Used for connecting wires and securing fixtures.
- Wire Cutters: Necessary for cutting and stripping wires.
- Voltage Tester: Ensures the power is off before you start working.
- Pliers: Help with twisting and connecting wires.
- Shovel: Needed for digging trenches for cables.
- Drill: Useful for mounting fixtures on hard surfaces.
Required Materials
Next, gather the required materials. These items are crucial for setting up your lighting system.
- Low Voltage Lighting Fixtures: Choose fixtures suitable for your outdoor space.
- Transformer: Converts high voltage to low voltage for safe outdoor use.
- Low Voltage Cable: Carries power from the transformer to the fixtures.
- Wire Connectors: Securely join wires together.
- Weatherproof Junction Box: Protects wire connections from the elements.
- Timer or Photocell: Automates the lighting schedule.
| Tool | Purpose |
|---|---|
| Screwdriver | Connecting wires and securing fixtures |
| Wire Cutters | Cutting and stripping wires |
| Voltage Tester | Ensuring power is off |
| Pliers | Twisting and connecting wires |
| Shovel | Digging trenches for cables |
| Drill | Mounting fixtures on hard surfaces |
Top Pick outdoor light: Gardencoin Solid Brass Outdoor Landscape Spotlights, 12V Heavy Duty Low Voltage Landscape Lighting, LED Spot Light Fixture Waterproof, Bronze Uplight Without MR16 Bulb (Classic, 12pack).
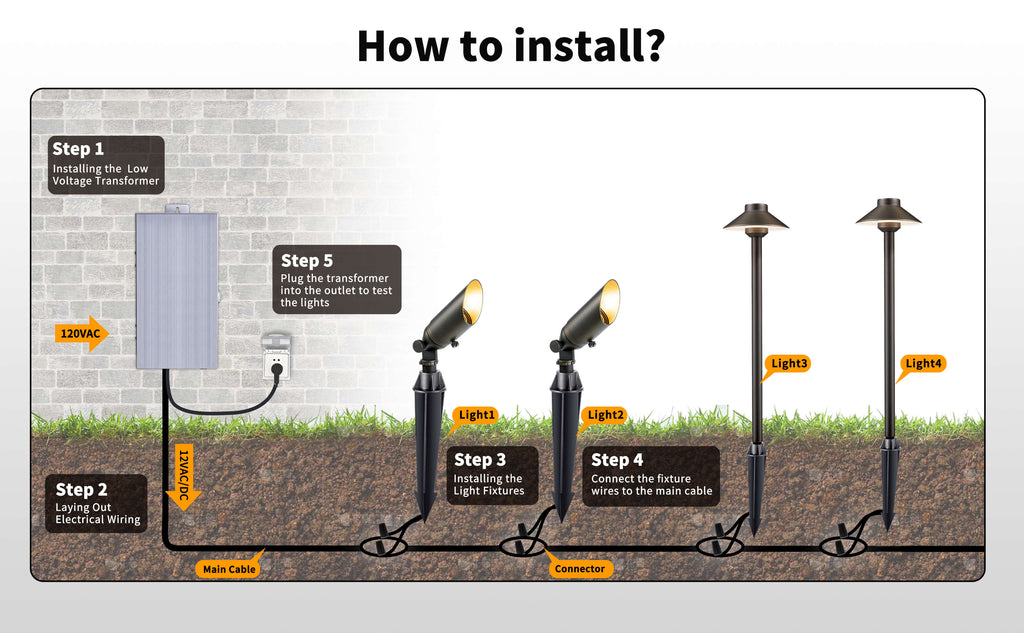
3. Installing The Transformer
Installing the transformer is a crucial step in setting up low voltage outdoor lighting. The transformer converts high voltage to low voltage, making your lights safe to use. Follow these steps to ensure a smooth installation process.
Selecting A Location
Choose a spot near a power outlet. This reduces the length of the extension cord. Ensure the location is dry and well-ventilated. Avoid placing the transformer on the ground. It should be at least 1 foot above the ground to prevent water damage.
Mounting The Transformer
Secure the transformer to a wall or sturdy post. Use screws and anchors for stability. Most transformers come with mounting brackets. Attach these brackets first. Then slide the transformer into place. Check that it is level and secure.
Connect the transformer to the power source. Plug it into a GFCI-protected outlet. This type of outlet helps prevent electrical shocks. Do not use an extension cord if possible. If needed, ensure it is rated for outdoor use.
Credit: www.gardenreet.com
4. Laying Out The Wiring
Installing low voltage outdoor lighting can transform your garden. The first step is laying out the wiring. This ensures that your lights work efficiently and safely. Let’s dive into the steps involved.
Measuring Wire Lengths
To start, measure the distance between each light fixture. Use a measuring tape for accuracy.
- Measure the distance from the power source to the first light.
- Then, measure between each additional light.
- Add these measurements together to get the total wire length needed.
It’s wise to add a few extra feet to your total. This allows for any unexpected turns or obstacles.
Placing The Cables
Once you have your wire lengths, it’s time to place the cables.
- Lay the cables on the ground along your planned route.
- Make sure the cables are straight and not tangled.
- Keep the cables close to the base of your house or garden path.
Use garden staples to secure the cables to the ground. This prevents them from moving or getting damaged.
Now, you’re ready to connect your lights and enjoy your beautifully lit garden!
5. Connecting The Lights
Connecting the lights is a crucial step in setting up your low voltage outdoor lighting system. Proper connection ensures your lights function well and last long. This section will guide you through the process of attaching fixtures and securing connections.
Attaching Fixtures
Start by placing your fixtures in their designated spots. Make sure they are stable and positioned to highlight your landscape features. Use a screwdriver to attach the fixtures to their mounting stakes or surfaces. Tighten the screws to keep the fixtures secure.
Securing Connections
Once the fixtures are in place, connect the wiring. Strip about half an inch of insulation from the wire ends. Twist the bare wires together firmly. Use wire connectors to secure the twisted wires. Ensure the connectors are tight to prevent any loose connections.
After securing the connections, wrap them with electrical tape. This provides extra protection against moisture and corrosion. Double-check all connections before turning on the power. Properly secured connections ensure your lighting system works safely and efficiently.
6. Testing The System
After setting up your low voltage outdoor lighting, it is crucial to test the system. This ensures everything works correctly and safely. Follow these simple steps to power up the system and check for any issues.
Powering Up
Start by connecting the transformer to a power source. Make sure the connections are secure. Turn on the transformer to supply power to the lighting system. Observe the lights; they should illuminate immediately. If not, check the power source and connections again.
It is essential to check the voltage at the transformer. Use a multimeter to measure the output voltage. It should match the voltage rating of your system. Proper voltage ensures optimal performance and longevity of the lights.
Checking For Issues
Once the system is powered up, walk around and inspect each light. Ensure every fixture is working as expected. Look for signs of flickering or dim lighting. These can indicate connection issues or voltage drop.
Check the wiring for any damage or loose connections. Secure any loose wires and replace damaged ones. Pay attention to the ground around the fixtures. Ensure no wires are exposed to prevent tripping hazards or electrical issues.
If you encounter any problems, consult the troubleshooting section of your installation guide. Most issues can be resolved with simple adjustments or replacements.
7. Maintaining Your Lighting Setup
Maintaining your low voltage outdoor lighting setup ensures it remains efficient and attractive. Regular checks and simple troubleshooting can keep your lighting system functioning well. This section covers how to maintain your lighting setup with ease and effectiveness.
Regular Inspections
Regular inspections help identify issues before they become serious. Follow these steps to keep your system in top condition:
- Check for Damaged Wires: Inspect wires for cuts or wear.
- Examine Bulbs: Replace any burnt-out or flickering bulbs.
- Clean Fixtures: Wipe down fixtures to remove dirt and debris.
Make these inspections a monthly habit to prevent unexpected problems.
Troubleshooting Tips
Even with regular maintenance, issues may still occur. Here are some quick troubleshooting tips:
- Lights Not Turning On: Check the power source and connections.
- Dim Lights: Ensure bulbs match the system’s voltage requirements.
- Flickering Lights: Tighten loose bulbs and inspect for damaged wires.
These simple steps can quickly resolve common issues with your outdoor lighting.

Credit: www.mrgutterlimited.com
Frequently Asked Questions
What Tools Do I Need To Install Low Voltage Outdoor Lighting?
You need wire cutters, a shovel, a voltage tester, and a screwdriver. A tape measure helps.
How Deep Should I Bury Low Voltage Lighting Cables?
Bury the cables about 6 inches deep. This prevents damage and keeps it safe.
Can I Install Low Voltage Lighting Myself?
Yes, it’s a DIY project. It’s safe and doesn’t require special skills.
How Do I Connect Low Voltage Lights To The Transformer?
Connect the light wires to the transformer terminals. Follow the instructions in the manual.
How Do I Choose The Right Transformer For My Lighting?
Calculate total wattage of your lights. Choose a transformer with a higher wattage rating.
Conclusion
Installing low voltage outdoor lighting enhances your home’s beauty and safety. Follow the steps provided to ensure a smooth setup. Always check connections and secure wiring properly. This will prevent any issues later. Use a timer for convenience and energy efficiency.
Enjoy your beautifully lit outdoor space every evening. Your landscape will look stunning and welcoming. Now, you’re ready to light up your garden with ease and confidence. Happy lighting!

My name is Mahi Uddin, and I’m a blog writer with over two years of experience specializing in creating engaging, informative content using AI tools. I contribute to InExDecor.com, where I share creative ideas and practical tips for transforming interior and exterior spaces into beautiful, functional environments. With a passion for storytelling and a knack for blending creativity with technology, I strive to craft blogs that not only inform but also inspire readers. When I’m not writing, you can find me exploring design trends or enjoying a good book with a cup of coffee.