Wiring outdoor lighting might seem tricky at first. But with the right guidance, it’s a manageable task.
Outdoor lighting can transform your space. It adds beauty and security to your home. Knowing how to wire these lights can save you money and give you control. This guide will help you understand the process step by step. From choosing the right lights to connecting them safely, we cover it all.
You don’t need to be an expert. Just follow along and learn the basics. Get ready to brighten up your outdoor areas!
1. Planning Your Outdoor Lighting
Proper planning is essential for a successful outdoor lighting project. It ensures not only functionality but also aesthetic appeal. This section will guide you through the key steps to plan your outdoor lighting effectively.
Assessing Your Needs
Start by evaluating what you need. Consider the purpose of the lighting. Are you aiming for security, ambiance, or highlighting specific features?
- Security Lighting: Bright lights to deter intruders.
- Ambient Lighting: Soft lights for a cozy atmosphere.
- Accent Lighting: Focused lights to highlight garden features.
Create a list of areas that need lighting. Pay attention to walkways, entrances, and dark corners. This assessment helps in determining the number and type of lights required.
Designing The Layout
Next, design the layout. Sketch a rough plan of your outdoor space. Mark the areas you identified earlier. This visual aid will help you decide the placement of lights.
Consider the following tips:
- Path Lighting: Place lights along pathways for safe navigation.
- Spot Lighting: Use spotlights to illuminate specific features like trees or statues.
- Flood Lighting: Install floodlights for wide coverage in open areas.
Think about the height and direction of each light. Ensure they do not cause glare or disturb neighbors. Use a mix of lighting types to create layers and depth in your design.
| Lighting Type | Purpose | Ideal Placement |
|---|---|---|
| Path Lights | Safe navigation | Along pathways |
| Spot Lights | Highlight features | Focal points |
| Flood Lights | Wide coverage | Open areas |
2. Choosing The Right Fixtures
Installing outdoor lighting can transform your garden. It enhances safety and highlights your home’s beauty. But how do you choose the right fixtures? This guide will help you make the best choice.
Types Of Outdoor Lights
Outdoor lights come in various types. Each serves a different purpose. Here are some popular options:
- Path Lights: These lights illuminate walkways and driveways. They prevent trips and falls.
- Wall Lights: Mounted on walls, they light up entryways and patios. They add to the home’s security.
- Floodlights: These are powerful lights. They cover large areas, like backyards or driveways.
- Spotlights: Use these to highlight specific features. They are great for trees or statues.
- String Lights: Perfect for creating ambiance. Use them for outdoor parties and gatherings.
Energy-efficient Options
Energy efficiency is important. It saves money and helps the environment. Here are some energy-efficient options:
| Type | Benefits |
|---|---|
| LED Lights | Last longer and use less power. They are bright and durable. |
| Solar Lights | Use sunlight to charge. No need for electrical wiring. |
| Low-Voltage Lights | Use less energy. They are safe and easy to install. |
Choose the right fixtures for your needs. Consider the type and energy efficiency. This will ensure you get the best results.
3. Gathering Necessary Tools And Materials
Before starting your outdoor lighting project, gather all necessary tools and materials. Preparation ensures a smooth and efficient process. Let’s look at what you need.
Essential Tools
Having the right tools is crucial for wiring outdoor lighting. Here are the essential tools:
- Wire Strippers: These help remove insulation from the wires.
- Screwdrivers: Both flathead and Phillips screwdrivers are needed.
- Drill: A drill is useful for making holes for the wires.
- Voltage Tester: This ensures the wires are not live.
- Electrical Tape: Used for securing wire connections.
- Wire Connectors: These help join wires together.
- Measuring Tape: To measure the lengths of wire needed.
Required Materials
Next, gather the necessary materials for your outdoor lighting:
- Outdoor Light Fixtures: Choose fixtures suitable for outdoor use.
- Outdoor Electrical Wire: This wire is designed for outside conditions.
- Electrical Boxes: These protect wire connections.
- Conduit: Conduit protects wires from damage.
- Grounding Stakes: These help keep the fixtures stable.
- Weatherproof Connectors: They ensure connections are safe from moisture.
- GFCI Outlets: These are essential for outdoor electrical safety.
With these tools and materials, you are ready to start wiring your outdoor lighting. Proper preparation makes the process easier and safer.
Credit: www.thehandymansdaughter.com
4. Safety Precautions
Before wiring outdoor lighting, prioritize safety. Understanding and following proper safety precautions can prevent accidents and ensure a safe installation. This section covers the essential safety measures to consider.
Checking Local Codes
Always check the local electrical codes before starting. These codes vary by location and ensure installations meet safety standards. Violating these codes can result in fines and unsafe wiring.
- Contact your local building department.
- Ask for guidelines on outdoor lighting.
- Ensure compliance with all regulations.
By adhering to local codes, you protect your home and family.
Using Proper Gear
Wearing the correct gear is crucial for safety. This includes items that protect against electrical shock and other hazards.
| Gear | Purpose |
|---|---|
| Insulated Gloves | Prevent electrical shock |
| Safety Goggles | Protect eyes from debris |
| Rubber-Soled Shoes | Provide grip and insulation |
Use these items to stay safe while working with electrical components.
Ensure all tools are in good condition. Inspect wires and connections for damage before starting. Take your time and never rush an electrical job.
5. Installing Electrical Wiring
Installing electrical wiring for outdoor lighting requires careful planning. The process must follow safety codes and guidelines. This ensures safe, efficient, and long-lasting lighting. Here, we will guide you through the steps of installing electrical wiring. You’ll learn how to run cables and connect them to the power source.
Running Cables
First, plan the route for your cables. Measure the distance from the power source to the lighting fixtures. This helps to determine the cable length needed.
Next, dig a trench that is 18 inches deep. This ensures the cable is safe from damage. Place the cable in a protective conduit. It shields the wiring from moisture and wear.
Secure the conduit with stakes every few feet. This keeps it in place. Make sure the conduit is level in the trench. Cover the conduit with soil, leaving room for adjustments.
Connecting To Power Source
First, turn off the power at the main circuit breaker. Safety is crucial.
Locate the outdoor electrical box. If there isn’t one, install it. Connect the conduit to the box using a connector. This ensures a tight fit and prevents water from entering.
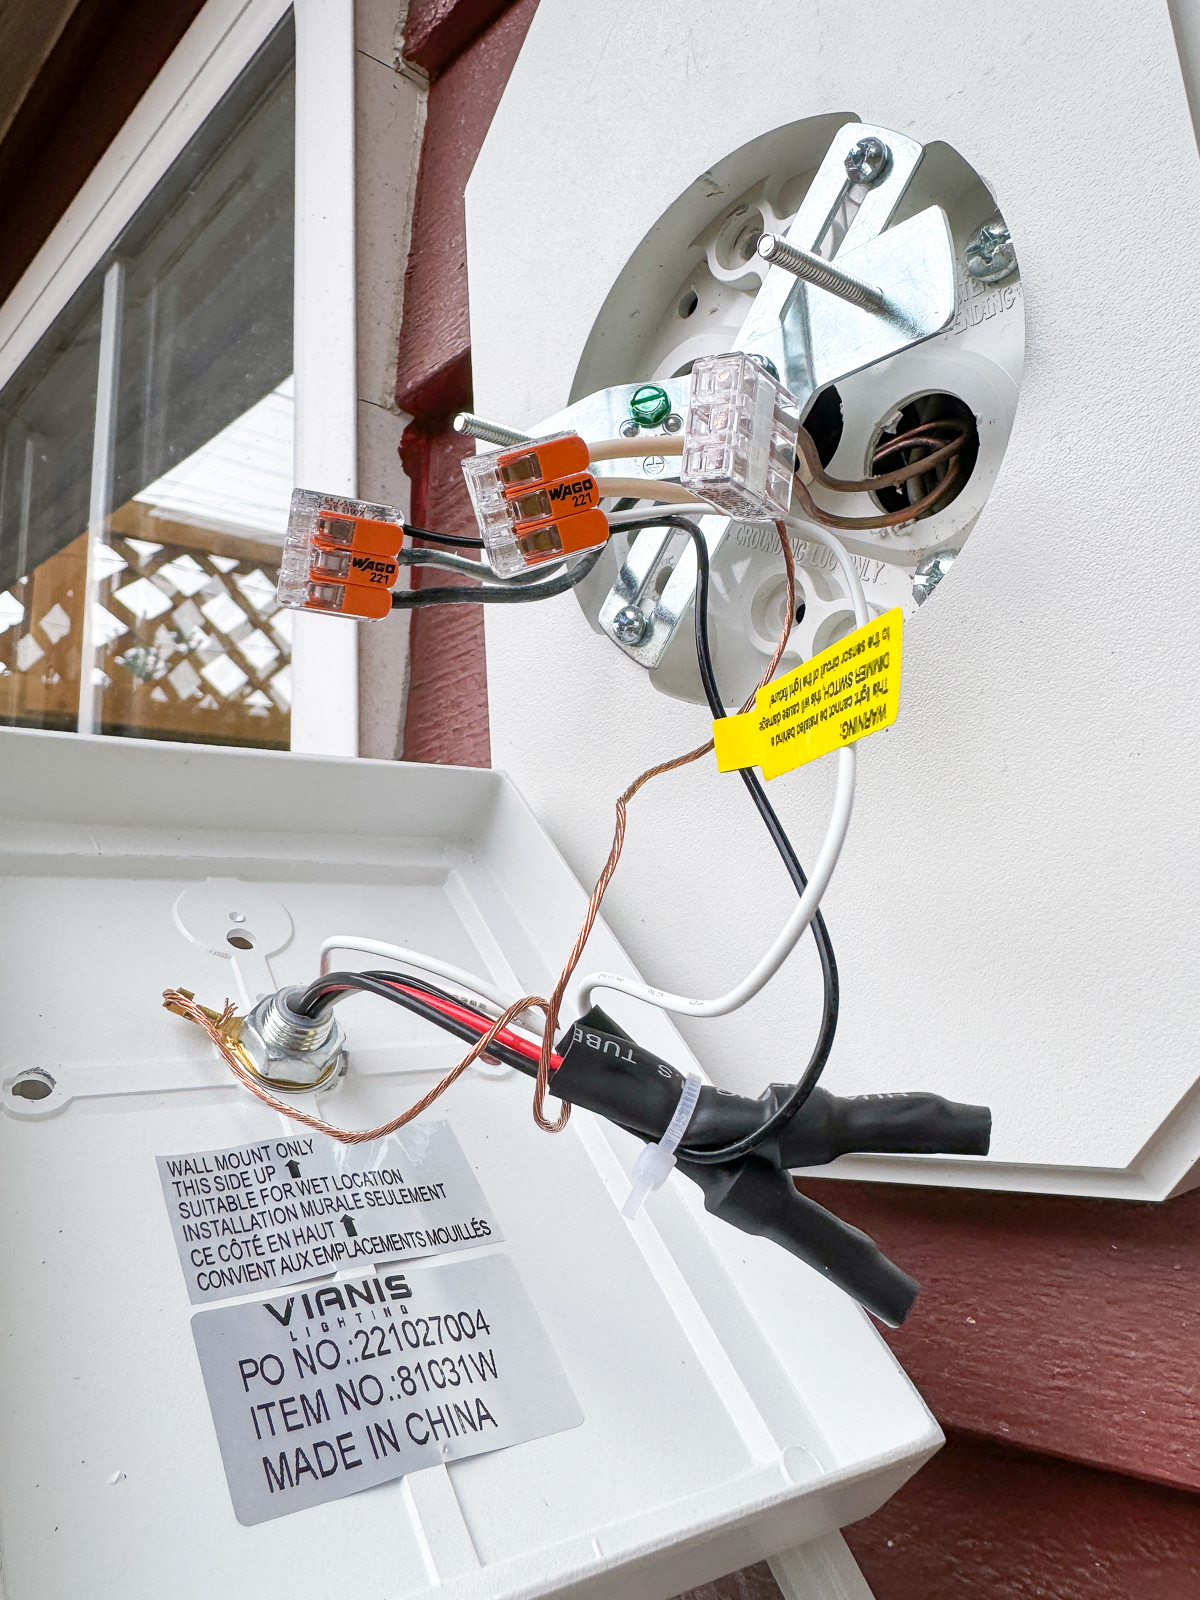
Strip the insulation from the wires. Connect the wires to the corresponding terminals in the electrical box. Typically, black connects to black, white to white, and green to the ground terminal.
Use wire nuts to secure the connections. Wrap electrical tape around the nuts for added safety. Turn the power back on and test the lights.
Following these steps ensures a secure and efficient setup. Your outdoor lights will function reliably, enhancing your outdoor space.
6. Mounting And Positioning Lights
Setting up outdoor lighting can transform your backyard into a cozy space. The key to effective lighting is mounting and positioning lights correctly. Placing lights in the right spots ensures safety and enhances the beauty of your garden. Let’s explore how to attach fixtures and adjust light angles to achieve the best results.
Attaching Fixtures
First, gather all necessary tools and materials. You will need:
- Screwdriver
- Drill
- Mounting brackets
- Screws
- Light fixtures
Follow these steps to attach your light fixtures:
- Choose a sturdy surface for mounting, like a wall or post.
- Mark the spot where you will install the brackets.
- Drill holes for the screws at the marked spots.
- Secure the brackets with screws using a screwdriver.
- Attach the light fixture to the brackets.
Ensure the fixture is tightly secured to prevent it from falling.
Adjusting Light Angles
Once the fixtures are mounted, you need to adjust the light angles. Proper angle adjustment is crucial for optimal lighting. Here’s how:
- Turn on the light to see the beam direction.
- Tilt the fixture up or down to achieve the desired coverage.
- Rotate the fixture left or right to fine-tune the light spread.
Make sure the light covers the intended area without causing glare. For pathways, direct the light downward to illuminate the walking surface. For trees or architectural features, use uplighting to highlight them beautifully.
Remember, the goal is to create balanced lighting that enhances safety and beauty.
7. Testing And Maintenance
Testing and maintaining your outdoor lighting ensures safety and longevity. Outdoor lights face elements like rain, wind, and debris. Regular checks are crucial to keep them working well.
Ensuring Proper Function
After installation, test each light. Turn on the power and check if all lights illuminate. Walk around your yard and inspect each fixture closely. Ensure no flickering or dimming. Adjust any loose bulbs or fixtures. A secure connection prevents future issues.
Use a voltage tester for detailed checks. Verify each light receives the correct voltage. This step helps identify faulty wiring early. Document any issues and address them promptly. Safety first!
Regular Upkeep Tips
Routine maintenance extends the life of your outdoor lighting. Clean the fixtures monthly. Dirt and debris can block light and cause overheating. Use a damp cloth to wipe down the lights.
- Check for damaged wires.
- Replace burnt-out bulbs immediately.
- Inspect for corrosion on metal parts.
Trim plants around the lights to prevent obstruction. Clear any leaves or twigs that may cover the fixtures. Proper airflow helps prevent overheating.
Consider a yearly professional inspection. An expert can spot hidden issues. They can also provide detailed cleaning and servicing.
| Maintenance Task | Frequency |
|---|---|
| Clean Fixtures | Monthly |
| Check for Damaged Wires | Monthly |
| Replace Burnt-Out Bulbs | As Needed |
| Professional Inspection | Yearly |
Regular upkeep ensures your outdoor lights shine brightly. It keeps your home safe and beautiful.

Credit: www.youtube.com

Credit: www.doityourself.com
Frequently Asked Questions
How Do I Choose The Right Outdoor Lighting?
Choose outdoor lighting based on the area to be illuminated. Consider brightness, weather resistance, and style.
What Tools Are Needed For Wiring Outdoor Lighting?
Basic tools include wire cutters, a voltage tester, and electrical tape. A screwdriver and drill may also be needed.
Can I Wire Outdoor Lighting Myself?
Yes, but ensure you follow safety guidelines. If unsure, hire a licensed electrician to help.
How Do I Ensure Outdoor Lights Are Waterproof?
Use waterproof fixtures and weatherproof electrical boxes. Seal connections with waterproof tape or gel-filled wire connectors.
What Type Of Wire Is Best For Outdoor Lighting?
Use UF (underground feeder) wire for direct burial. For above-ground, use THWN (thermoplastic high water-resistant nylon-coated) wire.
Conclusion
Outdoor lighting installation is simpler than it seems. Follow the steps carefully. Ensure all connections are secure. Use appropriate tools for safety. Proper lighting enhances your yard’s beauty. It also adds security. Test the lights before finalizing. Enjoy a well-lit outdoor space.
Happy wiring!

My name is Mahi Uddin, and I’m a blog writer with over two years of experience specializing in creating engaging, informative content using AI tools. I contribute to InExDecor.com, where I share creative ideas and practical tips for transforming interior and exterior spaces into beautiful, functional environments. With a passion for storytelling and a knack for blending creativity with technology, I strive to craft blogs that not only inform but also inspire readers. When I’m not writing, you can find me exploring design trends or enjoying a good book with a cup of coffee.