Setting an outdoor lighting timer is simple and saves energy. It keeps your outdoor areas well-lit and secure.
Outdoor lighting timers ensure your lights turn on and off at specific times. This saves you the hassle of manual switching and reduces electricity costs. Imagine coming home to a well-lit yard without lifting a finger. With a timer, you enhance security and convenience.
No more worrying about forgetting to turn off the lights. In this guide, you’ll learn the steps to set up an outdoor lighting timer. Whether you’re tech-savvy or a beginner, this guide is for you. Get ready to enjoy a brighter, safer outdoor space with minimal effort. Let’s dive in and make your outdoor lighting smarter and more efficient.

Credit: lightsatwholesale.com
How to Set Outdoor Lighting Timer? Easy Step-by-Step Guide
Choosing The Right Timer
Choosing the right timer for your outdoor lighting can seem daunting. The perfect timer can make your life easier and save energy. In this section, we will explore different types of timers and important features to consider.
Types Of Timers
There are various types of timers available for outdoor lighting. Analog timers are simple and easy to use. They have a dial that you turn to set the time. Digital timers offer more flexibility and accuracy. They often come with additional features like multiple settings and backup batteries. Smart timers can be controlled via smartphone apps. They integrate with smart home systems, offering remote control and automation. Solar timers use sunlight to set their schedules. They are eco-friendly and reduce energy costs.
Features To Consider
When selecting a timer, consider its ease of use. Look for a timer with clear instructions and intuitive controls. Durability is also important. Choose a timer made from weather-resistant materials to withstand outdoor conditions. Compatibility with your existing lighting system is crucial. Ensure the timer works well with your lights and power source. Energy efficiency is another key feature. Opt for timers that help conserve energy and reduce electricity bills. Finally, think about additional features like remote control or scheduling options. These can add convenience and flexibility to your outdoor lighting system.
Best outdoor lighting timer: BN-LINK 24 Hour Heavy Duty Mechanical Timer, Outlet Timer with 15 Minutes Intervals, Outdoor Timer Outlet Waterproof, 2 Grounded Outlets for Christmas Lights,15A 1/2HP, ETL Listed.
Gathering Necessary Tools
Setting an outdoor lighting timer can save energy and enhance security. Before starting, gather all necessary tools. Having everything ready will ensure a smooth installation process.
Required Tools List
First, identify and collect the essential tools. Here is a list of what you’ll need:
- Screwdriver
- Wire stripper
- Electrical tape
- Pliers
- Voltage tester
- Timer device
These tools will help you complete the installation effectively. Make sure you have them all before you start.
Safety Equipment
Safety is a priority when working with electricity. Ensure you have the proper safety gear:
- Insulated gloves
- Safety glasses
- Non-conductive shoes
Wearing the right safety equipment can prevent accidents. Always prioritize your safety during the installation process.
Preparing The Lighting System
Setting an outdoor lighting timer can enhance your home’s security and ambiance. Before diving into the installation, prepare your lighting system. This preparation ensures a smooth and hassle-free process. Follow these steps to get started.
Inspecting Current Setup
First, check your current lighting setup. Ensure all lights are functional. Replace any burned-out bulbs. Inspect the fixtures for damage. Make sure they are securely mounted. Cleaning the lenses improves light output. A clean setup ensures accurate timer performance.
Ensuring Power Supply
Next, verify the power supply. Ensure your lighting system is connected to a reliable power source. Check for loose wires and secure connections. A stable power supply is crucial. It guarantees the timer will work properly. If using solar lights, clean the solar panels. This step maximizes their efficiency and ensures optimal performance.
Installing The Timer
Outdoor lighting timers help save energy and keep your home safe. Installing a timer can seem tricky, but with the right steps, it becomes simple. This guide will show you how to set up your outdoor lighting timer efficiently.
Wiring Instructions
Before you start, ensure the power is off. Safety first!
- Open the timer casing. Check the wiring diagram inside.
- Connect the ground wire to the green screw.
- Attach the live (black) wire to the “Line” terminal.
- Connect the neutral (white) wire to the “Neutral” terminal.
- Join the load (black/red) wire to the “Load” terminal.
- Double-check all connections. Ensure they are tight and secure.
Important: Use wire nuts to secure the connections. Wrap with electrical tape for added safety.
Mounting The Timer
Choose a location that is easy to access and away from moisture.
- Use the provided screws to mount the timer.
- Ensure the timer is level. This helps in accurate time setting.
- Close the timer casing securely.
Tip: Install the timer at eye level. This makes it easier to read and adjust.
Once installed, test the timer to ensure it works correctly. Adjust the settings as needed to fit your schedule. Enjoy your newly automated outdoor lighting!
Setting The Timer
Setting the timer for your outdoor lighting can enhance your home’s curb appeal and security. Using a timer ensures your lights turn on and off at desired times, saving energy and providing convenience. This guide will help you set your outdoor lighting timer with ease.
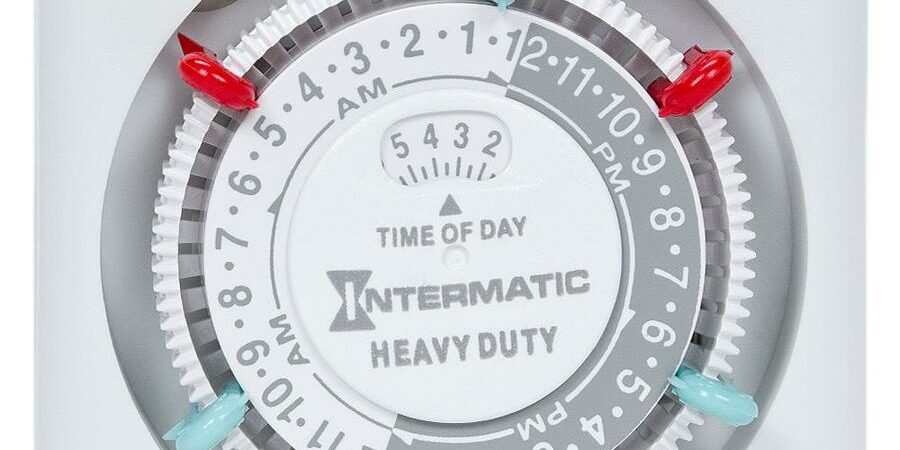
Setting On/off Times
First, locate the timer’s dial or buttons. Most timers have clear labels for setting the time. Choose the desired time for your lights to turn on. Rotate the dial or use buttons to set the start time. Make sure to set the correct AM or PM. Next, set the turn-off time. Follow the same process, ensuring the correct AM or PM is selected.
Double-check the times to avoid errors. Ensure the timer is set to the current time. This will ensure your lights turn on and off at the right times.
Programming Different Modes
Many timers offer different modes. These may include dusk to dawn, random, and manual modes. The dusk to dawn mode turns lights on at sunset and off at sunrise. This mode is ideal for security lighting. The random mode turns lights on and off at varying times. This creates the illusion of someone being home. Manual mode allows you to control the lights directly.
To set these modes, refer to your timer’s instructions. Usually, there are buttons or a switch for each mode. Select the desired mode and ensure it is activated. Check the settings by observing the lights over a few days. Adjust if necessary for optimal performance.
Credit: lexingtonoutdoorlighting.com
Testing The Setup
Testing the setup of your outdoor lighting timer is a crucial step. This ensures your lights turn on and off as intended. Let’s dive into the essential steps for testing your setup.
Verifying Connections
Begin by double-checking all connections. Make sure every wire is securely attached. Loose connections can cause your timer to malfunction. Follow these steps:
- Inspect all wiring connections.
- Ensure the timer is plugged in properly.
- Check for any exposed wires.
If everything looks good, you can proceed to the next step.
Conducting A Test Run
Now it’s time to conduct a test run. This will help confirm that your setup is functioning correctly. Follow these steps to ensure a successful test:
- Set the timer to turn on within the next few minutes.
- Wait and observe if the lights turn on as expected.
- Set the timer to turn off shortly after.
- Again, observe if the lights turn off as scheduled.
If the lights turn on and off at the programmed times, your setup is successful. If not, revisit the connections and timer settings.
Troubleshooting Common Issues
Setting an outdoor lighting timer can be tricky. Sometimes, issues arise that need troubleshooting. Below, we’ll explore common problems and their solutions.
Timer Not Working
If your timer is not working, check the power source. Ensure the timer is plugged in and the outlet works. Test the outlet with another device. If the outlet is fine, inspect the timer’s settings. Make sure the timer is set to the correct mode. Many timers have different modes for manual and automatic operation.
Next, examine the timer for physical damage. Look for cracks or worn out parts. If you find damage, the timer may need replacing. Sometimes, a simple reset can fix the problem. Unplug the timer for a few minutes, then plug it back in. This can reset the internal settings.
Incorrect Timing
If the lights turn on or off at the wrong times, check the timer’s clock. Ensure the current time is set correctly. Timers often have AM and PM settings, which can easily be confused. Verify the timer is set to the right day of the week as well. Some timers have different settings for weekdays and weekends.
Another common issue is the timer’s program settings. Ensure the on/off times are set correctly. Double-check each programmed time slot. If you recently had a power outage, the timer might have reset. Reconfirm all settings after a power loss. This can prevent future timing issues.

Credit: www.youtube.com
Frequently Asked Questions
How Do I Set My Outdoor Lighting Timer?
Locate the timer’s dial. Set the current time. Then, set the on and off times.
Can Outdoor Lighting Timers Save Energy?
Yes, they help reduce energy usage by ensuring lights are only on when needed.
What Types Of Outdoor Lighting Timers Are Available?
Options include mechanical, digital, and smart timers, each with unique features and benefits.
Are Outdoor Lighting Timers Easy To Install?
Most are user-friendly and come with clear instructions. Basic tools are usually all you need.
How Do I Troubleshoot A Malfunctioning Outdoor Lighting Timer?
Check the power source, reset the timer, and ensure it’s properly programmed. Consult the manual if needed.
Conclusion
Setting an outdoor lighting timer is easier than you think. Follow these steps to save energy and add security. Timers ensure your lights turn on and off automatically. This convenience offers peace of mind. Experiment with settings to find what works best.
Regularly check and adjust your timers as needed. Enjoy the benefits of a well-lit outdoor space. With a little effort, your home will shine bright.

My name is Mahi Uddin, and I’m a blog writer with over two years of experience specializing in creating engaging, informative content using AI tools. I contribute to InExDecor.com, where I share creative ideas and practical tips for transforming interior and exterior spaces into beautiful, functional environments. With a passion for storytelling and a knack for blending creativity with technology, I strive to craft blogs that not only inform but also inspire readers. When I’m not writing, you can find me exploring design trends or enjoying a good book with a cup of coffee.