How Do You Remove Halogen Light Bulbs? Removing halogen light bulbs seems tricky, but it’s simple with the right steps. First, safety is key.
Make sure the light is off and cool before you start. Halogen bulbs are common in many homes. They give bright, white light and are efficient. But, like all bulbs, they eventually burn out. Knowing how to remove them safely is important. Improper handling can cause injuries or damage. In this guide, we’ll walk you through the process. You’ll learn the tools you need and the steps to follow. By the end, you’ll confidently replace your halogen bulbs. So, let’s get started and make this task easy and safe for you.
Safety Precautions
Halogen Light Bulb Safety Precautions Handling. However, there are a few simple yet important steps that you can take to make the process of removing or replacing halogen bulbs as safe as possible. It’s essential to know how to handle a turkey, so let’s walk through some precautions you can take for your safety and the bulb’s.
Turning Off Power
Step 1: Making sure that the power is completely off before you touch halogen bulbs is the first and most important step. This is critical to eliminating any risk of electric shock. Turn off the light using the switch on the wall and though that should be enough, please make sure you do check that the power’s off before you touch anything. One easy way to try and do this is with the use of a voltage tester or power tester, if one is available. These tools can also ensure that no current is running to the bulb and are an additional safety feature. Always a good idea to verify and make sure the power is OFF for any project rather than risk an accident.
Wearing Protective Gear
Make sure to wear protective gear while working with halogen bulbs to keep yourself safe. Halogen bulbs may get very hot, so be sure to protect your hands and eyes from damage.
- Protective Gloves: Use protective gloves whenever handling halogen bulbs. The gloves protect you from getting burned on the bulb’s heat and from putting oils from your skin on the bulb. When the bulb warms up, oils can cause it to crack. The gloves provide a safe grasp of the bulb and prevent contact with its hot outer surface.
- Safety Goggles: Safety goggles can be a nice touch if you’re dealing with a bulb that could be fragile or a situation where you’re removing the bulb from a high fixture. The goggles protect your eyes from potential debris if the bulb breaks when you are using it.
Gentle Handling
Halogens are already more durable than regular incandescent bulbs, but remain fragile, and can be broken if not handled carefully. Be extra gentle with the bulb. Avoid pushing or twisting too hard onto the bulb, as this might crack or shatter it. Instead, gently grip the bulb, like the very base of it, and make sure you’re not pushing on the glass itself.
You’ll want to minimize the risk of injury and damage to your home by removing the bulb safely, taking basic safety precautions like turning off the power, wearing protective gear and handling the bulb with care. Being careful saves you time when removing or replacing halogen light bulbs, ensuring a hassle-free and safe experience.
Tools Needed
You’ll need a ladder, gloves, and a clean cloth. These tools help safely remove halogen light bulbs.
Basic Tools
- Ladder: A ladder is needed to safely access a halogen bulb that is in a high fixture or in a hard-to-reach place. Ensure the ladder is on a level surface and won’t tip and is stable somewhere else so it can’t fall over. A step ladder or extension ladder is ideal for providing added height to clean overhead fixtures, such as ceiling lamps or recessed lighting.
- Gloves: Using protective gloves is essential when working with halogen bulbs. They also keep the bulbs from transferring the oils from your skin onto the bulb, a characteristic that can weaken it and cause it to burn out. Gloves also keep you from griping the bulb too tightly and accidentally damaging it.
- Clean Cloth: A clean cloth is helpful for handling the bulb itself, especially if you should need to be handling the bulb — the bulbs contain skin oils that can transfer from your hands, so you’ll want to avoid touching it directly. You can also wipe around the fixture or bulb housing with the cloth to stave off dust and dirt contamination in that area.
- Screwdriver: You may need a screwdriver to remove the fixture cover or housing if the halogen bulb is housed in a fixture that uses screws or clips to secure the fixture. The screwdriver allows you to loosen or unscrew any fasteners that are securing the bulb in, so you can safely get to the bulb.
- New Bulb: Always a good idea to have the new bulb on hand to swap out before you get started So make things easier and quicker by having that new bulb on hand — you won’t have to stop when that old one is removed to grab the right bulb.
Optional Accessories
Although not essential, a few accessories can assist to make halogen bulb replacement easier and often faster:
-
Bulb Suction Cup: This silicone bulb suction cup makes gripping the bulb easy. It gives you a solid grip on the bulb’s surface, enabling you to extract or insert one at risk from dropping it and/or placing pressure on it unevenly.
- Headlamp: If you are working on a dimly lit area or require additional light when removing the bulb, a headlamp can come in handy with its light. This means that you will need to keep your hands free as you work, which can be beneficial when working in dark spaces like recessed light fixtures.
- Safety Glasses: These can be an excellent precaution especially when working with fragile bulbs which can shatter. In the unfortunate event of a bulb breaking, the glasses can keep your eyes safe from flying shards of glass or flying debris
- Electrical Tape: If you’re working with a light fixture that has exposed wiring, electrical tape can be useful for making sure any loose wires or connections are secure. This is so no electrical connections will come lose during the process while keeping a safe working environment.
Locating The Bulb
To remove halogen light bulbs, the first step is finding the bulb in its fixture. Since this is a critical part of the procedure, knowing how the bulb is placed and accessed can make the removal much smoother. You will make the removal process much easier on yourself once you have identified the correct fixture and made safety preparations.
Identifying The Fixture
The first thing is to find the light fixture that contains the halogen bulb. Check for screws, clips or other fasteners that might be holding the fixture in place. These fasteners are typically used to secure the bulb’s housing or cover in place, so they must be removed or loosened before the bulb itself can be accessed. Some fixtures use plastic clips or a metal clip to hold the bulb in a certain place, which is common for ceiling-mounted or recessed lighting fixtures. You should pay attention to whether the light bulb is covered and protected with a cover or a shade. If covered, you will have to remove or lift off the cover to reveal the bulb.
If the bulb is exposed, this might be relatively simple to deal with, but if it’s within a cover, or enclosed within a fixture, it helps to think ahead about how you’re going to access it. Sometimes a cover is screwed or clipped on, and to remove it you may have to unscrew or unclip parts. Identifying the setup of the fixture and knowing whether or not the bulb is exposed or inside a cover, will help you ensure all proper tools and plan of action are prepared for the removal.
Accessing The Bulb
After identifying the fixture and locating the bulb, you can prepare to access the halogen bulb. Above all, be safe when working with electrical components, make sure you kill the power completely before you move forward. This is a critical step to minimize the risk of electric shock or injury to yourself while removing the disposal.
Remove it only after the bulb has cooled completely. Halogen bulbs, especially, produce significant heat when they’re on and can stay hot for several minutes after shutoff. Grappling with a hot light bulb can burn you, and the temperature difference can result in your bulb shattering. Letting the assembly cool first ensures that you are safe when handling the bulb.
If the bulb is set high up — in a ceiling fixture, for instance — bring a ladder or stool so you can reach high enough. Do not climb on an unstable ladder or stool. If you’re using a stool, ensure it’s stable on the floor and doesn’t wobble, because any instability can lead you to lose your balance while working with the bulb.
After safely positioning yourself, check the fixture for a cover you need to remove. Most halogen bulbs are inside a protective cover to prevent a dust accumulation or deformation from accidental impact. If needed, remove the cover gently without causing any tears. Specifics will vary by fixture, but this may mean unscrewing a cover or simply lifting or sliding it off. With the cover off, the halogen bulb is completely exposed, and you can start the process of unwrapping it from its socket.
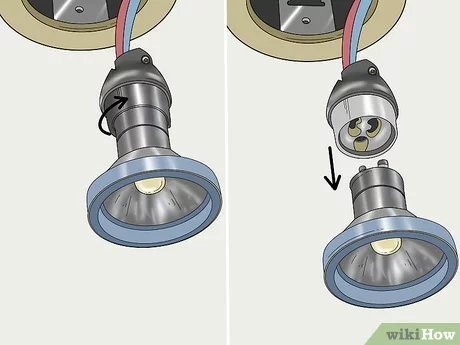
Removing The Bulb
Now that you have exposed the bulb, hold the bulb gently, taking care not to squeeze so hard as to shatter the glass. Most halogen bulbs twist in place in their sockets, so after determining the direction they need to turn according to the fixture, gently twist the bulb to unscrew it. There is a pin or base to disengage in some types, so you need to know what you’re working with. The bulb should come free gently, once you have twisted it out of its socket.
Look for some sort of thief-proofing or obstacle, and the bulb may not come out as easily as it sounds. Never force the bulb in; doing so might shatter the glass and create a safety hazard. After the bulb is removed from the fixture, you can properly throw it away or set it up to be replaced.
Cooling Down The Bulb
Halogen bulbs operate at very high temperatures and are hot for some time after turning it off. Be sure to let the bulb cool completely before trying to handle it. Cool-down may take several minutes—depending on how long the bulb has been on. This step takes patience to be sure. The halogen bulb you touch will burn you or the glass will shatter from a thermal shock. Always ensure that the bulb is cool before attempting any removal or maintenance.
Proper Handling Techniques
Halogen bulbs should be handled very carefully to avoid damaging the bulb, and injuring yourself. Halogen light bulbs are more fragile than a few different sorts of bulbs, so appropriate taking care of keeps them in one piece and completing their work. Here are a few key tips for safe and effective handling:
- Use Gloves or Cloth: Always wear gloves or use a cloth while handling the bulb to prevent direct contact with the bulb. This keeps the natural oils on your skin from getting onto the glass. Your skin’s oils can create hot spots on the bulb, and during operation those hot spots can cause the bulb to overheat or even crack. Over time, the oils can even break down the integrity of the bulb, shortening its life span.
- Do Not Touch the Glass Portion: The glass portion of the bulb should never be touched by your bare hands. The oils on your skin may weaken the bulb and cause it to break when put under heat. Instead, only grip the bulb by the base. The base is the part of the bulb your use to attach it to the fixture, and this part is generally made of some material that won’t damage your bulb during touch.
-
Grip the Bulb by Its Base: Always handle the bulb by its base. This area, which is the most stable and secure section of the bulb, would help prevent any breakage when handling. Don’t push on the plugged end of the bulb’s glass or put enough pressure on it to make it crack.
Disposing Of The Bulb
Use safe methods to dispose of halogen bulbs. Recycle them if possible. Some areas have special recycling programs. These programs help keep the environment clean. Old bulbs should be handled with care. Never throw them in regular trash. They can break and cause harm. Use a recycling center for proper disposal. Ask local stores if they have recycling options.
Every area has different rules for bulb disposal. Check with your local waste management. They can provide guidelines. Follow these rules to avoid fines. Some places may have drop-off points. These are safe places to leave old bulbs. Always check the labels for disposal info. It’s important to comply with local laws.

Credit: www.youtube.com
Installing A New Bulb
First, check the wattage of your old bulb. Use the same wattage for safety. Next, choose the correct base type. Halogen bulbs have different bases. Read the packaging to ensure you get the right one.
Hold the new bulb with a clean cloth. Oils from your fingers can damage the bulb. Align the pins with the socket holes. Push the bulb gently but firmly until it clicks into place. Finally, turn on the light to test your new bulb. Enjoy your bright and efficient lighting.
Final Checks
Turn on the light switch. Check if the new bulb lights up. Look for any flickering or dimming. Ensure the bulb is securely in place. If the bulb works well, you have installed it correctly.
Verify that the bulb is the right type for the fixture. Avoid touching the bulb with bare hands. Use a clean cloth if needed. Check for any unusual smells or sounds. Safety is important. Never leave the light on unattended. Always make sure the bulb cools down before touching again.
Frequently Asked Questions
How Do You Safely Remove Halogen Bulbs?
To safely remove halogen bulbs, first, turn off the power. Let the bulb cool, then gently twist or pull it out. Use a cloth or gloves to avoid oils from your skin.
Do You Need Gloves To Change Halogen Bulbs?
Yes, wearing gloves is recommended when changing halogen bulbs. Skin oils can damage the bulb, reducing its lifespan and causing it to burn out quickly.
Can Halogen Bulbs Break Easily?
Halogen bulbs can break easily due to their thin glass and high pressure. Handle them carefully to avoid breakage and potential injury.
What Should You Do If A Halogen Bulb Breaks?
If a halogen bulb breaks, carefully clean up the glass using a broom and dustpan. Avoid touching the fragments with your bare hands to prevent cuts.
Conclusion
Removing halogen light bulbs can be simple. First, ensure the power is off. Next, let the bulb cool down. Carefully twist or pull the bulb to remove it. Dispose of the bulb properly. Insert the new bulb by reversing the steps.
Always handle bulbs gently. Following these steps keeps you safe and gets the job done efficiently. Now, you can confidently change halogen light bulbs. Happy lighting!

My name is Mahi Uddin, and I’m a blog writer with over two years of experience specializing in creating engaging, informative content using AI tools. I contribute to InExDecor.com, where I share creative ideas and practical tips for transforming interior and exterior spaces into beautiful, functional environments. With a passion for storytelling and a knack for blending creativity with technology, I strive to craft blogs that not only inform but also inspire readers. When I’m not writing, you can find me exploring design trends or enjoying a good book with a cup of coffee.